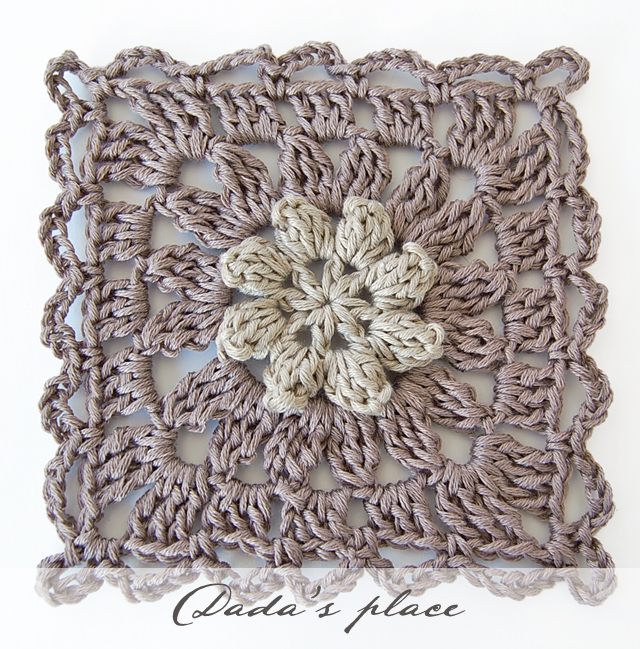
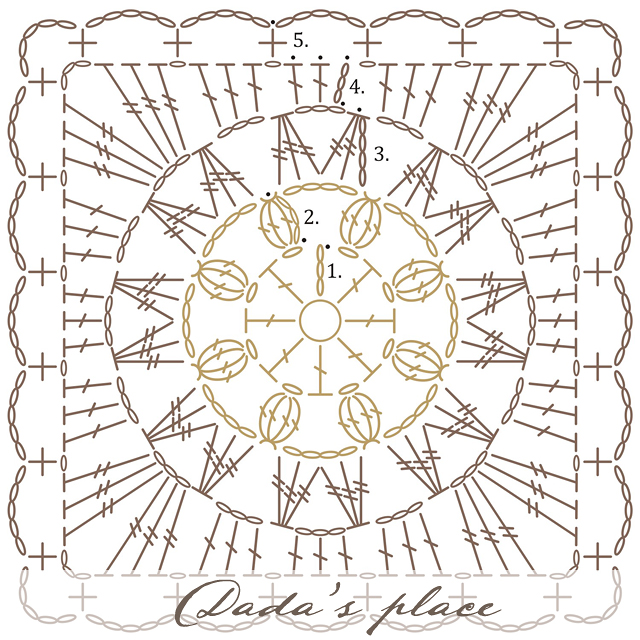
Color A is gold, color B is brown
Begin with a magic ring.
Rnd 1: Color A
ch-4 in ring (counts as dc and ch-1), * dc in ring, ch-1; repeat from * 6 more times. Close the ring. Join with slip st to initial ch-4 space (8 dc)
Rnd 2: Color A
Make Beginning Popcorn, then ch-4; * Popcorn in next ch-1 space, chain-4; repeat from * six more times, join with slip stitch to Beginning Popcorn. (8 Popcorn stitches with ch-4 between each Popcorn)
Rnd 3: Color B
Join color B in any ch-4 spaces of the second round, make beginning Cluster (tr3tog – treble crochet three together), ch-3, tr3tog in same ch-4 space, ch-3, * (tr3tog, ch-3, tr3tog) in next ch-4 space, ch-3; Repeat from * 6 more times; Join with slip st to top of beginning Cluster (16 tr3tog with ch-3 between each tr3tog)
Rnd 4: Color B
Make slip st to next ch-3 space, ch-3 (counts as dc), 2 dc in same space, ch-1, * 3 dc in next ch-3 space, ch-1, (3 tr, ch-3, 3 tr) in next ch-3 space, ch-1, (3 dc in next space, ch-1) twice; repeat from * 2 more times, 3 dc in next space, ch-1, (3 tr, ch-3, 3 tr) in next space, ch-1, 3 dc in next space, ch-1, join with slip st to top of initial ch-3.
Rnd 5: Color B
Make slip st in 2 next dc, (sc in next ch-1 space, ch-5) twice, * (sc, ch-5, sc) in next ch-3 space of the corner, (ch-5, sc in next ch-1 space) four times, ch-5; Repeat from * 2 more times, (sc, ch-5, sc) in next ch-3 space, (ch-5, sc in next ch-1 space) twice, ch-5, join with slip st to first sc or make an invisible join.
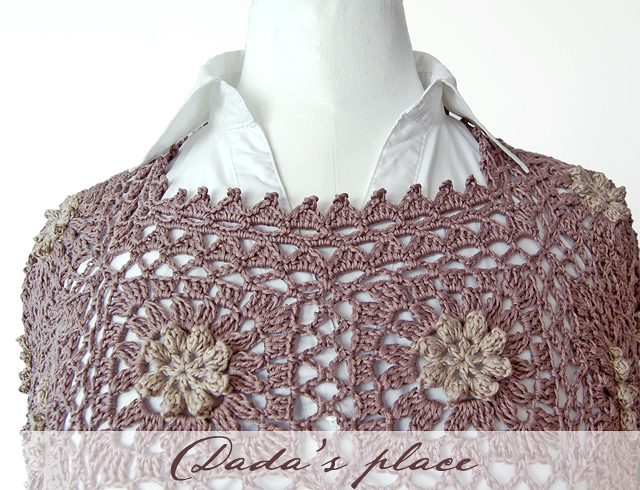
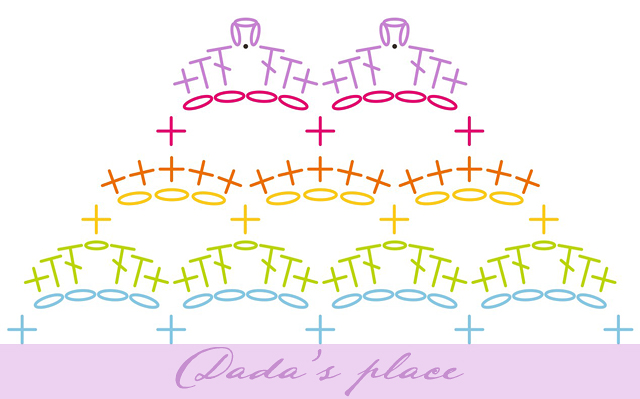
Row 1: sc in ch-5 space, ch-4
Row 2: sc, hdc, dc, ch-1, dc, hdc, sc in ch-4 space
Row 3: sc in ch-1 space, ch-3
Row 4: 5 sc in every ch-3 space
Row 5: sc in third sc, ch-4
Row 6: sc, hdc, dc, Picot-3, dc, hdc, sc in each ch-4 space
So beautiful!
Absolutely lovely!!
fantastično i divno za obući, ja sam srećnica koja to zna iz prve ruke! :)))
so beautiful, thanks for the pattern
Thank you very much for the detailed description of the pattern..I think I will try it soon
Muy bonito, muchas gracias por el gráfico.
Saludos.
The tunic turned out lovely! And I'm not saying this just because you used brown shades. 😉
Thank you very much for sharing the square.
So pretty..
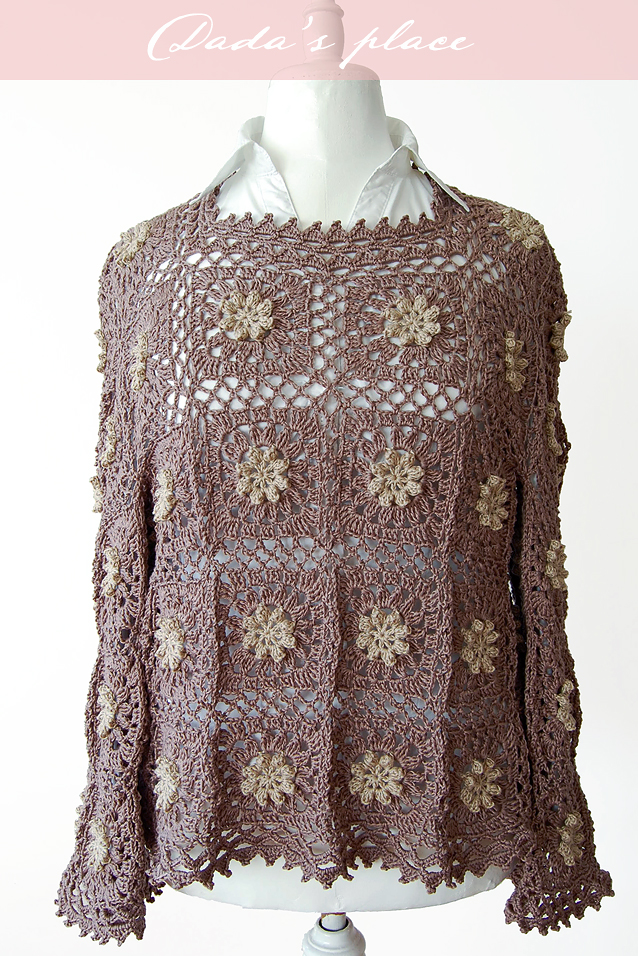
Hi, I love this tunic and I am beginning one for me. I have a question for you. How did you join the granny squares together? I can see you joined them by the 5 chains, but I can’t figure how. I’d love to hear from you. Thanks.
Hi Simone,
Thanks! I’m so glad that you like the tunic and decided to make one for yourself! ? I used join-as-you-go method for joining my squares. I made ch-2, then join to the other square with slip stitch, and then again ch-2. Hope this will help you!
Hugs,
Dragana
Thank you for your quick reply. I am still making the squares (I love the way they look) and when I get to the point to join them, I will work as you said. Thanks again, hugs,
Simone.
No, you don’t need to finish your squares first, and to join them together later. You won’t be able to join them later if you complete all the rows. You have to join them as you go, which means that you have to make only one complete square. The first one. The rest of the squares you will complete and at the same time join them together. If you don’t know how join-as-you-go method works, go to YouTube and watch some tutorials, don’t waste time and yarn to crochet squares which you won’t be able to use later.
Oh… I got it… now everything makes sense. Good thing I had made just a few, now I am unraveling the outside part to join them “as you go”. It’ll be my first time using this method. I am having some youtube lessons first. Thank you for the tip!!!
You’re welcome! I’m glad you didn’t make to many squares!
This is so beautiful – I am going to make one for myself this winter – thanks for sharing this pattern…
Thank you so much for sharing!
The square is beautiful, and I love the pictures and diagrams. I find it much quicker and easier to read diagrams than consentrating on written instructions.
I hope you don’t mind me asking how many squares you needed to finish the tunic? Did you join the sleeve squares diagonally, or does it just look like it on the photo?
Again, thank you:-)
You’re welcome! I’m glad you like it! I didn’t write down how many squares I used for the tunic, and I don’t have it anymore, so I can’t count the squares. No, I didn’t join the sleeve squares diagonally.
Good afternoon Dada from Scotland UK,
Oh how pretty is this “poncho”, i love how your beautiful tunic turned out and could have offered up the body that would fit it, lol. I am normally making for everyone else and rarely do i knit or crochet for myself but this is going to be the exception to that rule and i am not even going to change the colour scheme as it is beautiful as it is and will go lovely with my camel trousers as well as boring old black. Thank you flower for sharing with such kindness your design,
love and crafty hugs
Norah (glenochil village, Scotland)
Dear Norah,
Thank you! I’m so glad to hear that you decided to make this poncho or tunic for yourself! Please send me a picture when you finish it, I would like to see it! ?
Hugs,
Dragana
I am wanting to crochet the Primavera tunic but I can’t find anything that tells me how much of each yarn I need to purchase. Please tell me how much so I can get started. I am planning to use two different colors of yarn. Thank you for all your beautiful creations
Hi Joy,
I’m sorry to disappoint you, but I really don’t know how much yarn I spent.
This is such a beautiful tunic; I can’t wait to make it. I also loved your pattern for the “original” Primavera Granny Square. You have such lovely photos and clear, precise instructions. Some of the best I have seen. I think you should write a book!
Thank you so much Debi! ? You’ve just made my day! ?
Simplemente, HERMOSA!
Muchas ganas de intentarlo. Veremos de estrenarlo en la recién venida Primavera!
MUCHAS GRACIAS!
You’re welcome! ?
bela túnica vc fez linda artesã parabéns lindo trabalho vc fez vc mt caprichosa .bjs cristina do rio de janeiro brazil,
email thinamar@yahoo.com.br
Thank you Maria! Best regards to Brazil from Serbia! ? ?
Good morning! This is beautiful! I’m making one for my daughter…then maybe me, too! Can you give an idea of the way you did this? Looks like 4 squares across the front all the way down…how many across the back? One square above for the shoulders, then two for the width of the sleeve? Thanks for a lovely pattern!
Hi Debbie,
I’m not sure, I don’t have that tunic any more, so I can’t check it out.
Hello, will it be possible to give a lay out of blocks for the final tunic and
what method used to crochet blocks together? Thank you in advance for this stunning pattern
Hi Sonja,
I made this tunic a long time ago, and I don’t have it anymore. I can only say that I join it using join-as-you-go method. Thanks for your kind words!