![]()
The Primavera flower square is undoubtedly my most popular free tutorial. I’m so happy and grateful that so many of you gave it a try and made really beautiful blankets and pillowcases. Since I didn’t write the tutorial for the whole blanket, many of you asked me how I had joined the squares and made the border, so I decided to make those tutorials too, so anyone who wants to make the exact same blanket as I did, now can do so.
![]()
Ok, I’ve already shown you how to make the Primavera flower granny square. (Click here to check it out if you haven’t already) Now, I will show you how to easily join them together with single crochet. This joining method is very simple. So, let’s get started!
![]()
Crochet terms: This tutorial is written using standard US crochet terms. UK terms are given in brackets.
Skill level: Beginner
Yarn: For this Primavera flower blanket I used 100% cotton yarn 125m/50g “Tanja” from Bimtex (manufacturer from Serbia)
We will use the following stitches: slip stitch, single crochet (double crochet), standing single crochet (standing double crochet), chain stitch, half double crochet (half treble crochet), 5dc popcorn stitch (5 tr popcorn stitch) and invisible join.
Stitches:
Slip stitch (slip st): Insert the hook into stitch, yarn over and draw yarn through stitch and through loop on your hook.
Single crochet (sc): Insert hook into stitch, yarn over, pull up a loop, yarn over, and draw yarn through both loops on hook.
Standing single crochet: Make a slip knot on your hook. Insert hook into stitch, yarn over, pull up a loop, yarn over, and draw yarn through both loops on hook.
Chain stitch (ch): Yarn over, draw yarn through loop on hook.
Half double crochet (hdc): Yarn over, insert hook into stitch, yarn over, pull up a loop, yarn over, and draw yarn through three loops on hook.
5 dc Popcorn stitch: ch-3, make 4 dc in same space, drop loop from hook, insert hook from front to back between ch-3 and first dc, grab dropped loop, yarn over, draw yarn through two loops on hook.
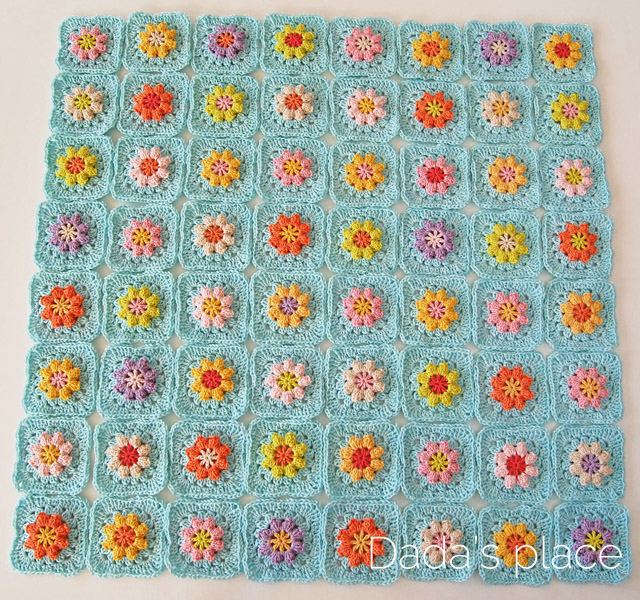
Lay out your squares in the way you want them to appear on your blanket. We will first join together all the horizontal rows, and then all the vertical ones. We’ll start form the top right hand corner and we’ll join the squares together from right to left.
My blanket has 64 granny squares in total, eight horizontal rows, and eight vertical ones. I decided to join my squares with white color, but you can choose to use the same color as the background of the squares, or whatever other color you like. The choice is all yours, so be creative!
I like to make a pile of squares for each row – the first square is at the top of the pile, and the last one is at the bottom. That way I don’t have to think about which square I should join next.
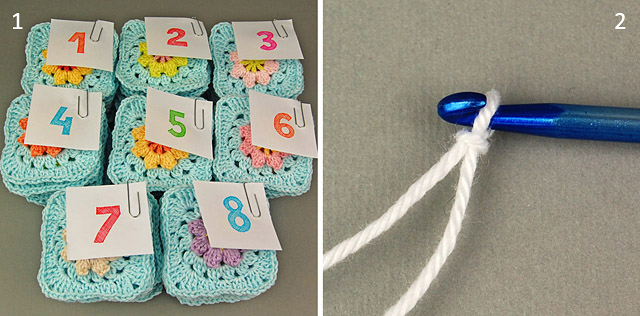
(Picture 1)
We will start with standing single crochet, so make a slip knot on your hook. (Picture 2)
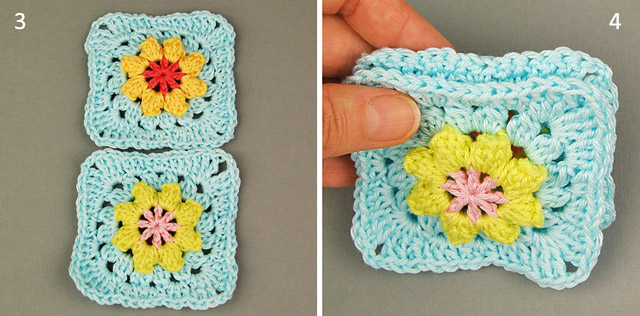
Now, we’re going to join our first two horizontal rows together, so you will need the first squares from the pile no. 1 and no. 2. (Picture 3)
Take the first square from both piles and put them together – facing wrong sides together. Line up your squares so the edges and stitches match. (Picture 4)
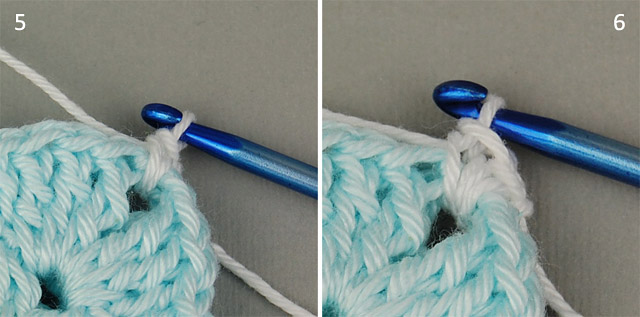
Insert your hook from front to back through ch-2 space of both squares, and make standing single crochet (standing double crochet) (Picture 5)
Make single crochet (double crochet) in the same space. (Picture 6)
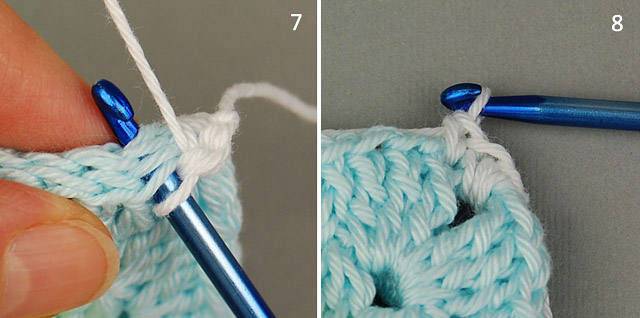
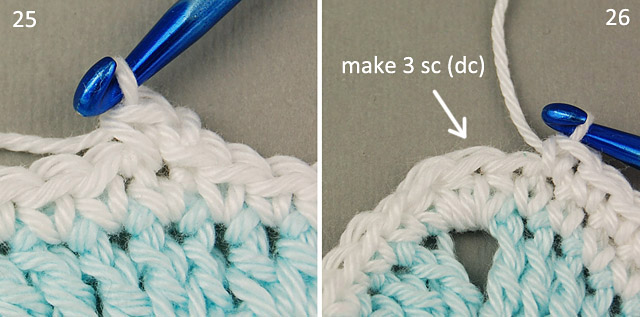
Now, we’re going to make sc (dc) in the next stitch. Be sure to pull the hook through both squares, and both loops – front and back. (Picture 7)
Finished sc (dc) (Picture 8)
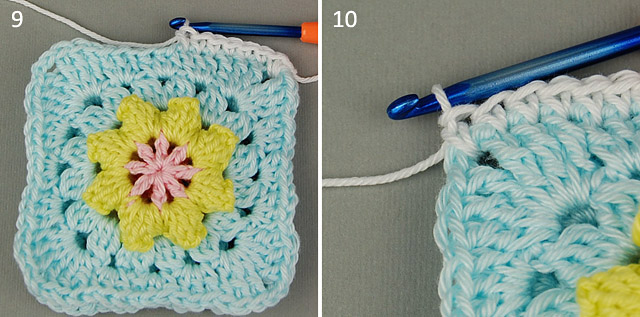
Continue working 1 sc (dc) into every stitch. (Picture 9)
When you reach the left corner, make 1 sc (dc) in ch-2 space. (Picture 10)
Take the next pair of squares facing wrong sides together and lean them against the first two squares. (Picture 11)
Keeping them close together, make 1 sc (dc) in the next ch-2 space. (Picture 12)
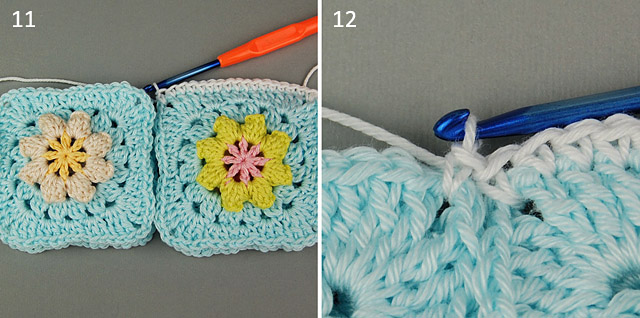
Keep working 1 sc (dc) into every stitch. When you’ve joined the second pair of squares, take the third pair (Picture 13) and repeat the procedure until you have joined all 8 pairs (my case) of squares. When you reach the left corner of the last pair of squares, make 2 sc (dc) in ch-2 space.
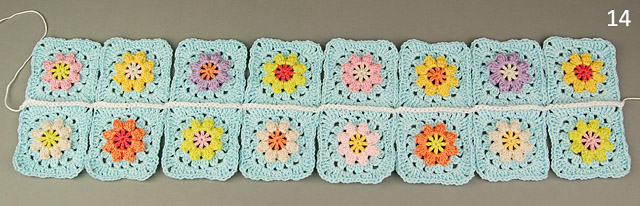
These are my first two rows joined together. (Picture 14)
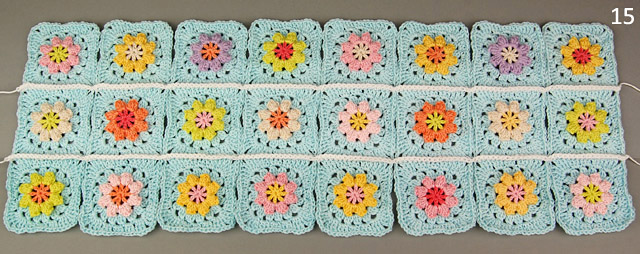
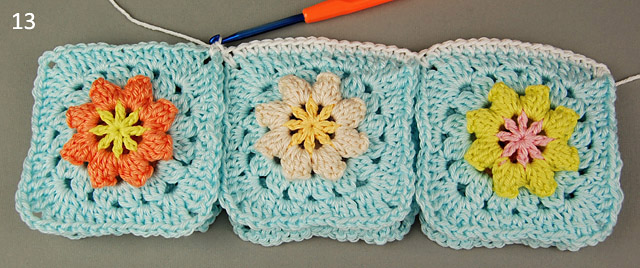
Now, take the third pile of squares and join the third row in the same way you joined the first and the second row together. (Picture 15)
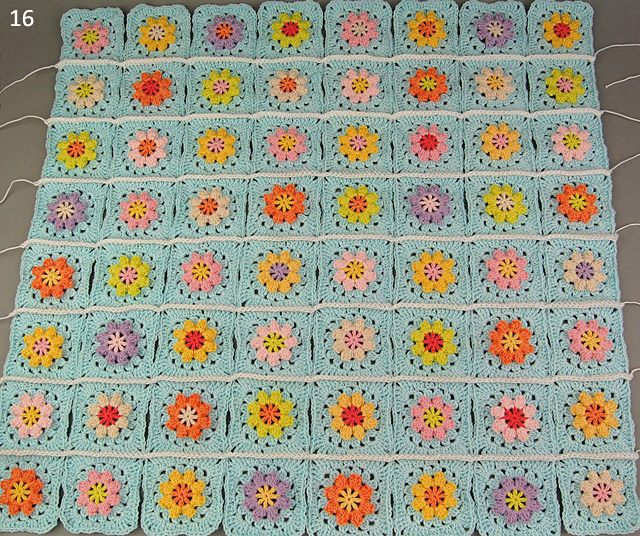
Continue joining horizontal rows in the same way until you have joined them all together. (Picture 16)
We will join the vertical rows in the same way we joined the horizontal rows. We’ll work from right to left. Start with the squares in the upper right hand corner.
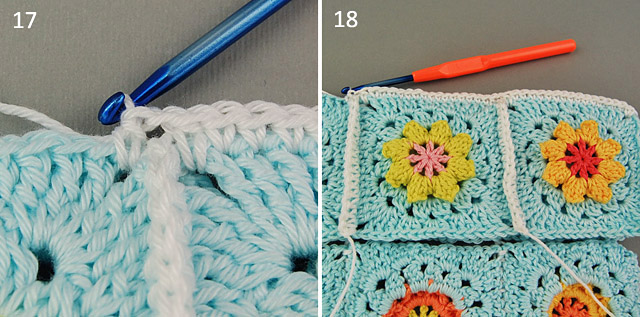
Join the first two squares in the same way we joined the horizontal squares before, until you reach the point where your horizontal join meets your vertical join. Make hdc (htr) in the last stitch before the join, ch-1, then make hdc (htr) in the first stitch after the join. (Picture 17)
When you reach the second join, repeat the previous procedure. (Picture 18)
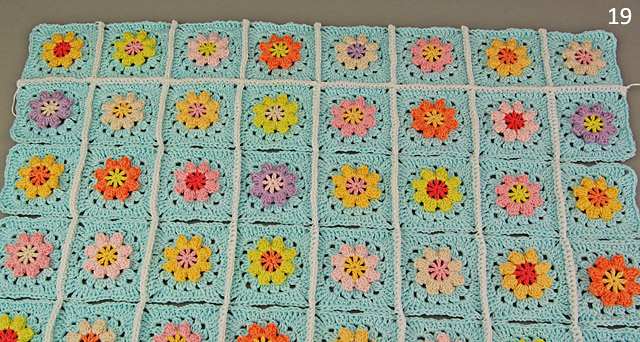
These are my first two vertical rows joined together. (Picture 19) Don’t forget to make 2 sc (dc) in the left corner of the last pair of squares.
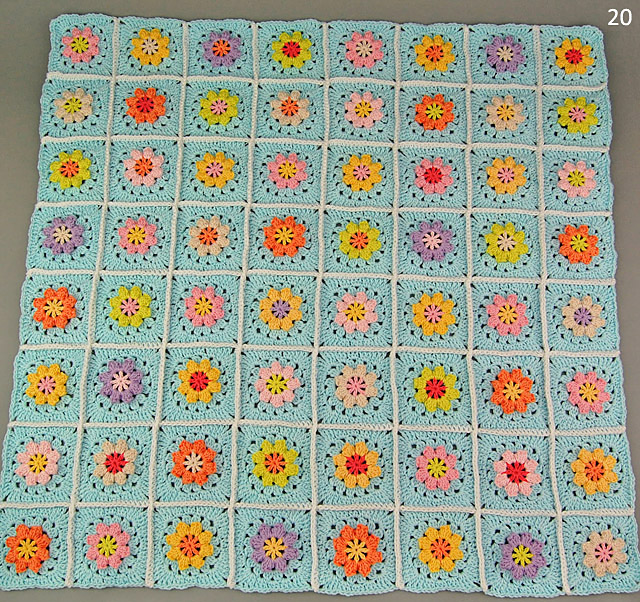
Continue joining the squares until you join together all of your vertical rows. Don’t forget to make 2 sc (dc) in the left corner of the last pair of squares of each row. Weave in the yarn ends. (Picture 20)
Now, we just have to make the border!
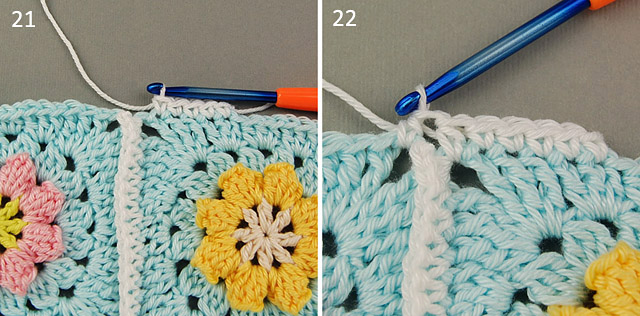
We will start the border with standing sc (dc), so make a slip knot on your hook. Make standing sc (dc) in any stitch. Work 1 sc (dc) in each stitch until you reach the join of two squares. (Picture 21)
Make 1 hdc (htr) into the last stitch before the join, and 1 hdc (htr) into the first stitch after the join. (Picture 22)
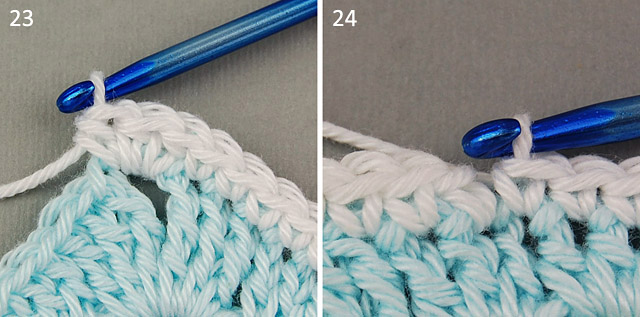
Continue working 1 sc (dc) into each stitch; When you reach the corner make 3 hdc (htr) into ch-2 space. (Picture 23)
Work 1 sc (dc) along the blanket until you reach the beginning of the row. (Picture 24)
Join with slip st to the standing sc (dc), make ch-1, then sc (dc) in the same stitch. (Picture 25)
The second row is the same as the first, so make 1 sc (dc) into each stitch, until you reach the corner. (Picture 26)

Make 3 sc (dc) in the second hdc (htr) of the group of 3 hdc (htr) we made previously in ch-2 space of the corner. (Picture 27)
Work 1 sc (dc) into each stitch along the blanket until you reach the beginning of the second row. (Picture 28)

Join with slip st to the first sc (dc), make ch-1, then sc (dc) into the same stitch. (Picture 29)
Work 1 sc (dc) into each stitch; When you reach the corner, make 3 sc (dc) in the second sc (dc) of the group of 3 sc (dc) (Picture 30)
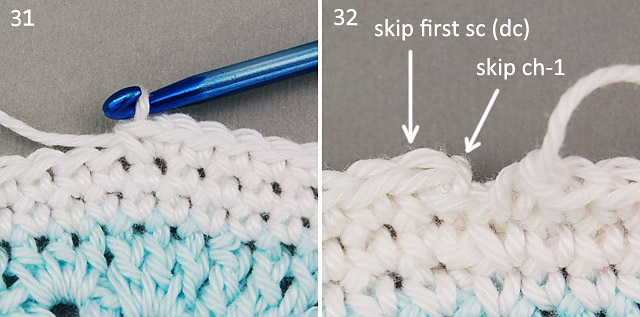
Continue working 1 sc (dc) in each stitch, and make 2 sc (dc) in one stitch on each side of the blanket. We need an extra stitch on each side of the blanket for the border later. (Picture 31)
When you reach the beginning of the row, cut the yarn and pull it through the stitch. (Picture 32) We’re going to make an invisible join.
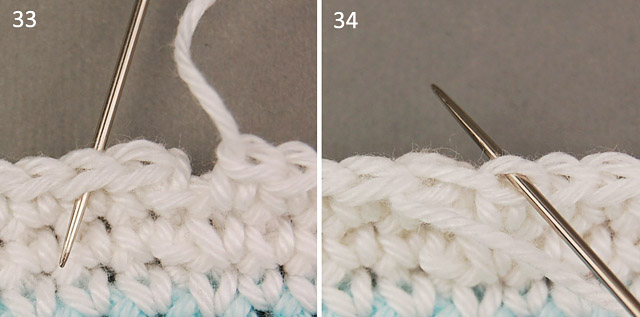
Thread a tapestry needle. Skip the first sc (dc) and insert your needle under both loops of the next sc (dc) from back to front and pull it through. (Picture 33)
Insert the needle back into the last sc (dc) you made, from front to back, through the back loop only, and pull it through. (Picture 34)
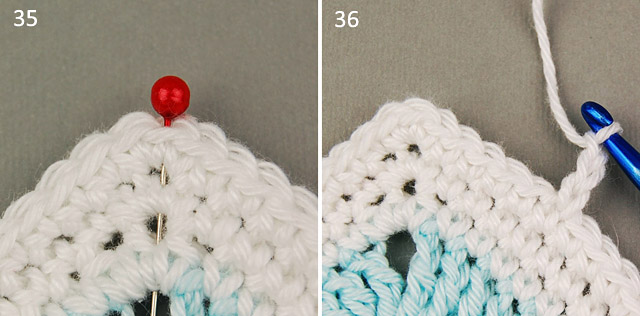
Now, we have to count the stitches from the corner stitch, so I marked it with a pin. It’s the second sc (dc) of the group of 3 sc (dc). (Picture 35)
Count six stitches to the right of the corner stitch. Insert the white yarn into that stitch and make ch-3 (counts as hdc (htr) + ch-1). (Picture 36)
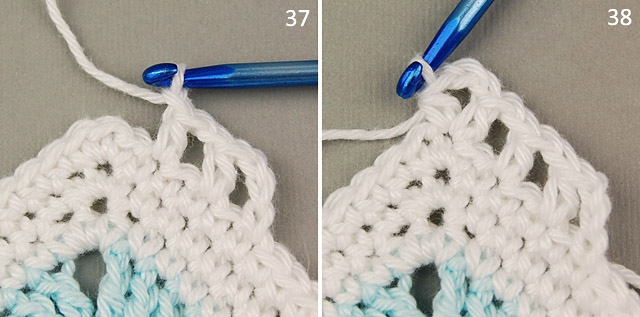
Skip the next st, make hdc (htr) into the next stitch, ch-1, skip the next st, hdc (htr) in the next stich, ch-1; (Picture 37)
Skip the next stitch, make hdc (htr) into the next stitch (corner stitch), ch-2, hdc (htr) into the same stitch. We just made the first corner. (Picture 38)
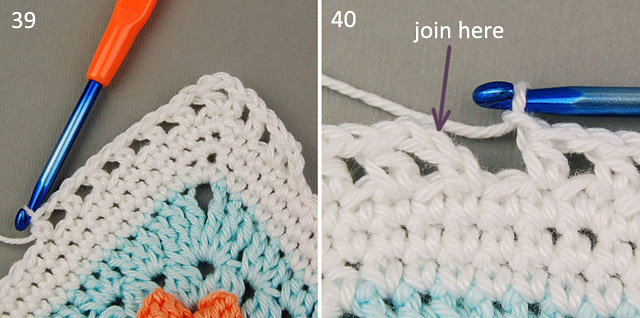
Make * ch-1, skip the next stitch, hdc (htr) into the next stitch; Repeat from * along the blanket. In the corners make: hdc (htr), ch-2, hdc (htr) into the same stitch. (Picture 39)
When you reach the beginning of the row, make ch-1; (Picture 40)
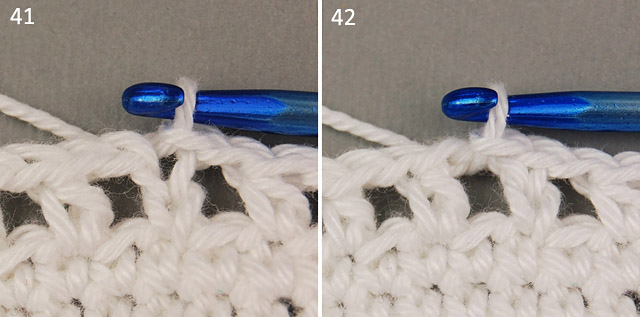
Join with slip st to the second chain of the initial ch-3. (Picture 41)
Make slip st into the next ch-1 space. (Picture 42)
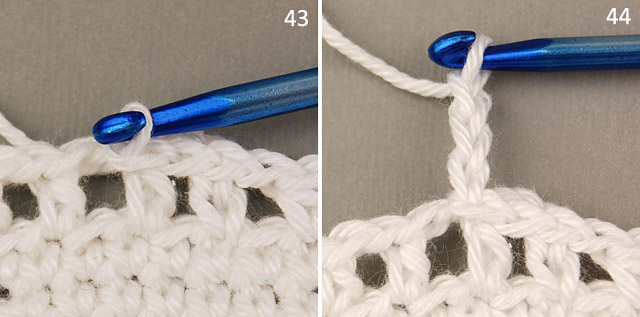
Skip the next hdc (htr) and make another slip st into the next ch-1 space. (Picture 43)
Now, we’re going to make a popcorn stitch, so make ch-3. (Picture 44)
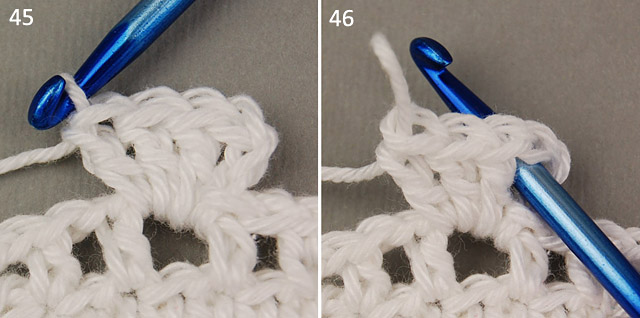
Make 3 dc (tr) in the same chain space; (Picture 45)
Drop the lop from your hook, and insert it between the initial ch-3 and the first dc (tr) of the group of 3 dc (tr); (Picture 46)
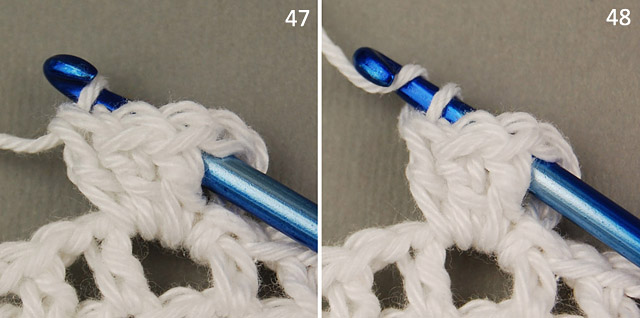
Grab the dropped loop with your hook, (Picture 47)
yarn over, (Picture 48)
and pull the yarn through both loops on your hook. (Picture 49)
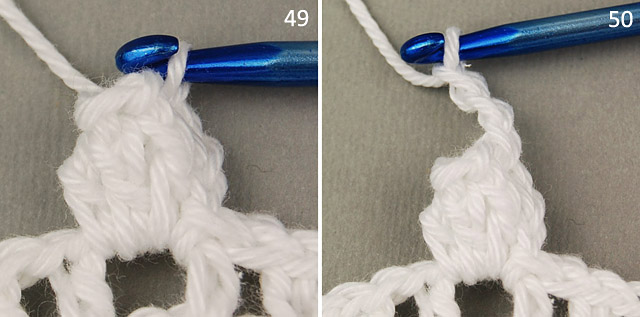
Make ch-3; (Picture 50)
then make slip stitch in the same space. (Picture 51)
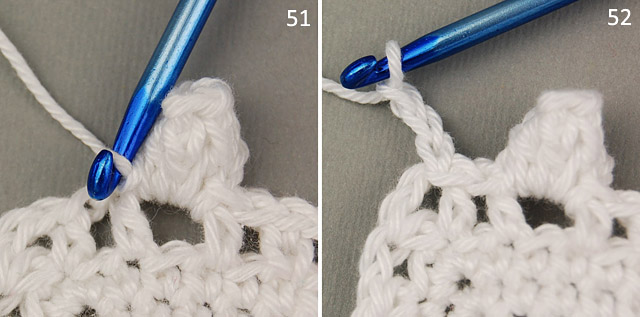
Make slip st in the next 2 chain spaces, then ch-3; (Picture 52)
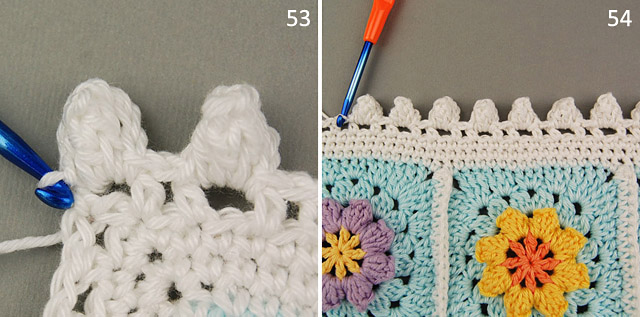
Make popcorn stitch, ch-3, slip st in the same space. (Picture 53)
Make * slip st in the next two ch-1 spaces, ch-3, popcorn stitch, ch-3, slip st in the same space; Repeat from * around the blanket. (Picture 54)
![]()
I hope you enjoyed this tutorial, and if you make your own Primavera flower blanket I would love to see it! You can post your pictures on my Facebook page, or share on social media. Please use the hashtag #primaveraflowerblanket
Happy crocheting!
*
Great photo tutorial, dear, and wonderful blanket as well. I love these colors! Pinned! Have a lovely weekend!????
Thanks lovely! ? I’m so glad you like it! Thanks for pinning! ? ?
Great tutorial. Beautiful blanket. Thanks so much for sharing with us all
Thank you so much for this tutorial. I made a Primavera blanket last year and now I am looking forward to try your other beautiful patterns.
Oh, thank you Charis! So glad to hear that you’ve already made the Primavera blanket! ? ? ?
Hi Charis and Dada, I would love to try out this pattern as well. How much yarn do I need?
Hi July,
Sorry, I don’t have that information.
beautiful colors are a perfect match it is just right from the heart. it would be a pleasure, to reproduce these blankets to my granddaughter. thankyou.
Thank you so much Carol for your nice comment! ? ? ? ?
Thanks so much for all the help that you give us, I check out your post as often as I can, or whenever I get a notice from you. Have you ever done a post on your rose baby blanket. I would love to see one.
Thank you Debbie, I’m so glad you like my work! ? ? I don’t know which blanket you think of, I have several floral blankets, please click on this link: https://www.dadasplace.com/blankets there you will find all of my blankets.
To je umetnost, Dada.
Hvala Tjasa! Od ?!
xo Dragana
Fabulous, clear and well written instructions, I will get my squares sorted to finish as soon as my current wip is done! Thankyou.
Thank you for your sharing, I will follow your instructions in the post
What are the final dimensions of this blanket?
Hi Tabitha,
The blanket measures 65 cm x 65 cm.
Absolutely gorgeous and so very well explained. Looking forward to making this beautiful blanket. Thank you for sharing
You’re welcome! I’m so glad you like it!
Thank you so much for wonderful detailed patterns and explanations especially when one can’t afford to buy expensive patterns. It is really appreciated!
You’re welcome! I’m glad if I can help! 🙂
I love your work. I hope to be as good as you some day.
Thank you Darlene! You will! Just keep practicing! 🙂
Dear Dada. Absolutely beautiful. Thank you for sharing your Primera Flower Blanket pattern. Can’t wait to start crocheting again. Recently retired and have enough time on hand nowadays. Kind regards. Gina. South Africa
Thanks Gina for your kind words! ? How exciting it is that now you have time to do what you like! Enjoy! Happy crocheting! ?
x Dragana
This blanket is AMAZING! Do you know how much yarn you used for it?
Thank you Katie! I’m sorry to disappoint you, but unfortunately, I don’t know how much yarn I used for the blanket.
Do you know if the yarn you used was mercerized?
Hi Katie,
Yes, it was mercerized cotton yarn.
This is so precious and beautiful. Thank you for the tutorials. A True labour of love. I have just learned ‘basic’ Granny Square and love making them. But this is pinned now as I would love to try it Thank you !!
Hi Claire, Thank you so much for your kind words! ? I’m glad you like it! ?
Thanks for your beautiful tutorial. I have made all of the squares and am now trying to crochet them all together. I have put them in piles as you suggested but have just realised that seeing I am left handed I don’t think your method will work for me. Shuold I start at the bottom of the piles and work from left to right? I hope this makes sense?? Please help
Hi Suzanne,
Yes, you should start at the bottom of the piles, or when you make your piles put the squares which are on the left on top of the pile, and the squares which are on the right on the bottom. And yes, I think that you should work from left to right.
xo Dragana
Thanks so much for your reply. You have given me the confidence to continue on with this beautiful project. Your the best. X
Oh, thanks Suzanne! ? I’m soooo happy to hear that! ? Happy crocheting!
I’m a bit confused on one thing, is it a sc and dc in each space as directed?
Tutorial is written using standard US crochet terms. UK terms are given in brackets. So, if you prefer US terms than follow instructions in the tutorial, and if you prefer UK terms follow the stitches given in brackets.
will try it so beautiful and you explain it to make it look easy thank you i live in australia so glad i found you site
Thank you Teresa! I’m glad you found my tutorials easy to follow! Happy crocheting!
Hi Dada, I really love ? your patterns and they are very easy to follow. I look forward to trying your other patterns. Tina ?
Dear Tina,
So glad you like my patterns and found them easy to follow!
Hi Dada
your crochet are very nice and beautiful
marzi .Iran
Thank you so much Marzi!
Glad you like it!
xo Greetings from Serbia
This is gorgeous! How do you sequence the squares in rows, etc.? Random? or is there a pattern? Thanks!
Thanks! Yes, random, I don’t have pattern or square placement chart.
Oh this blanket is so beautiful! It’s been on my to do list for a few years now. Almost finished with the border, wanted to say Thank You for this tutorial.
I’ll be sending this to England for my new granddaughter. ?
Thank you Tess! I glad you like the tutorial!
xo Dragana
Thank you for the beautiful pattern. It has been my quarantine project. Will be the perfect gift for a friend at work.
You’re welcome! I’m glad that my pattern helped you through these difficult times! Hope your friend will like it!
Just completed this blanket. very nicely explained.. thank you so much for sharing ??
You’re welcome! Thanks for your kind words! 🙂
If I wanted to make a bigger blanket….like for a Queen size bed…how would I do that? Obviously I would make more squares? Would I make the squares bigger? I’m pretty new at crochet, so this may be a silly question.
Yes, you should make more squares.
Thank you so much for your lovely and colorful pattern and color suggestion. I love this baby blanket!!!
I am planning to do it.
Thanks Theresa! 🙂
I can’t find the tutorial and I’ve been searching on the best way to connect squares