• Facebook
  • Instagram
  • Pinterest

Dada's Place

Crochet wonderland

  • Home
  • Blog
  • Dada’s shop
  • Free Patterns
  • Categories
  • About
  • Contact

Timi Blanket Pattern

19/12/2019 by Dada Filed Under: Crochet blankets 10 Comments

Mosaic crochet blanket pattern Timi blanket 1

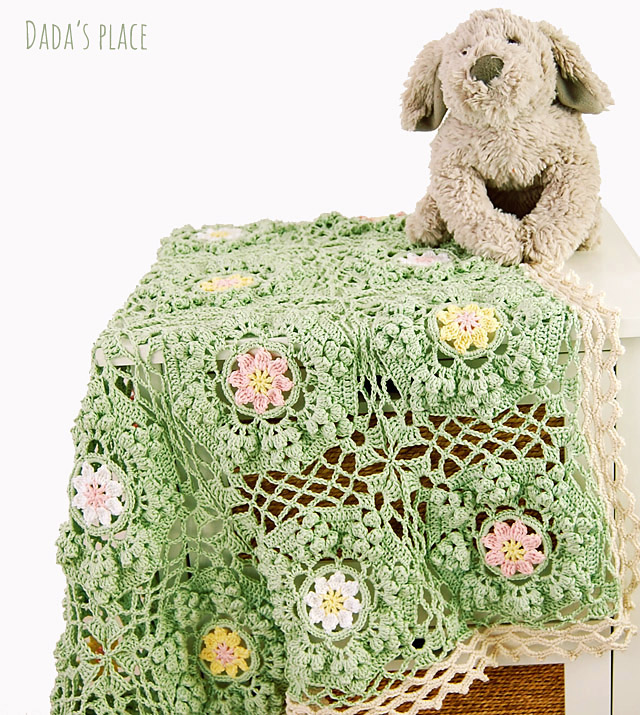
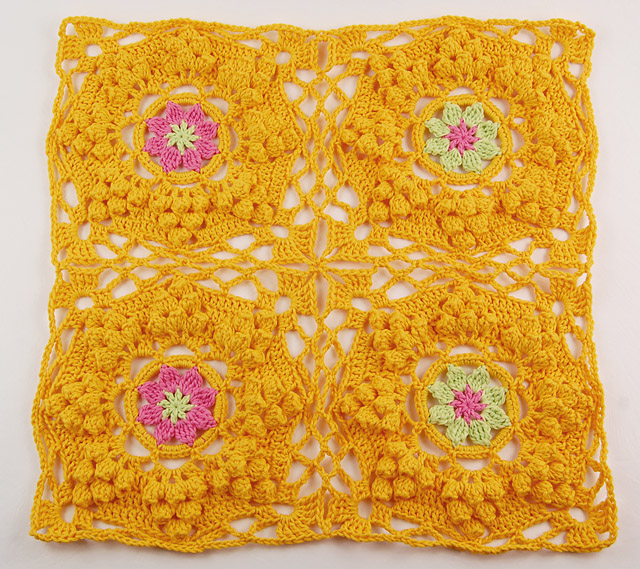
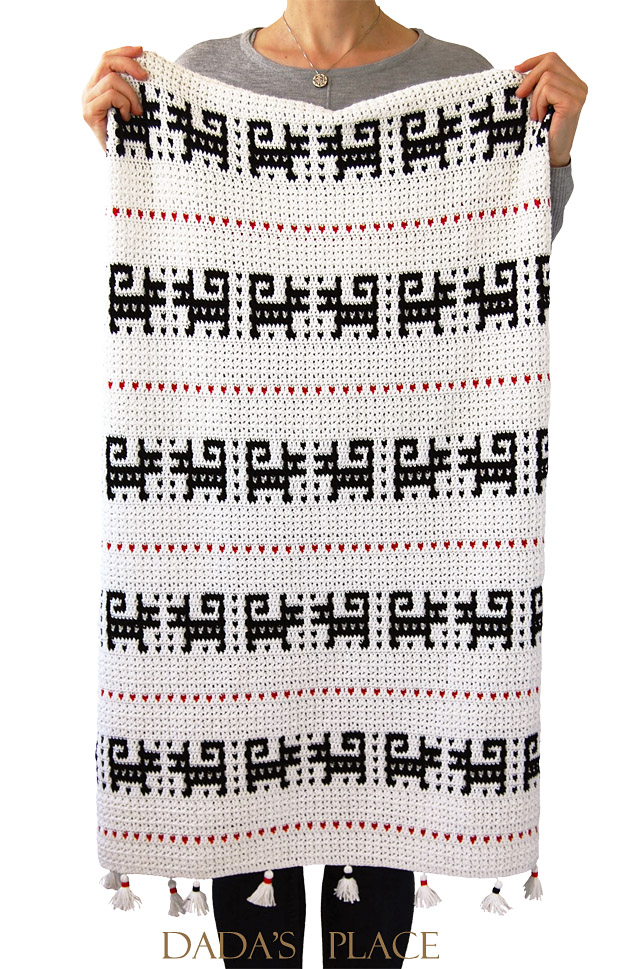
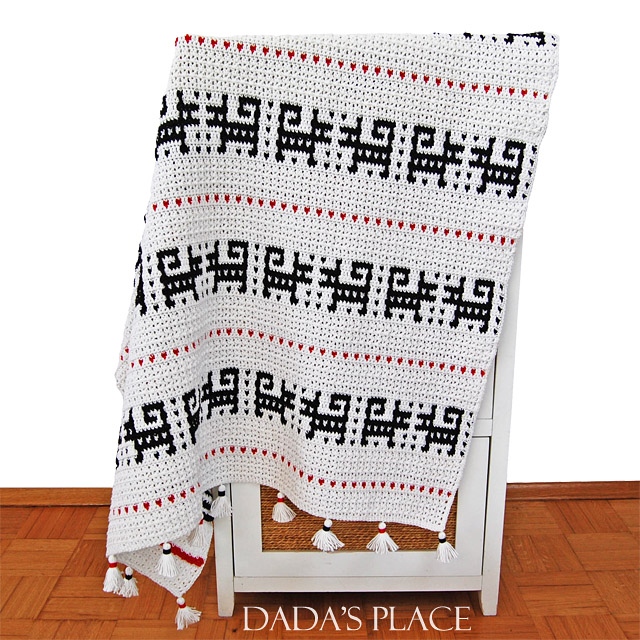
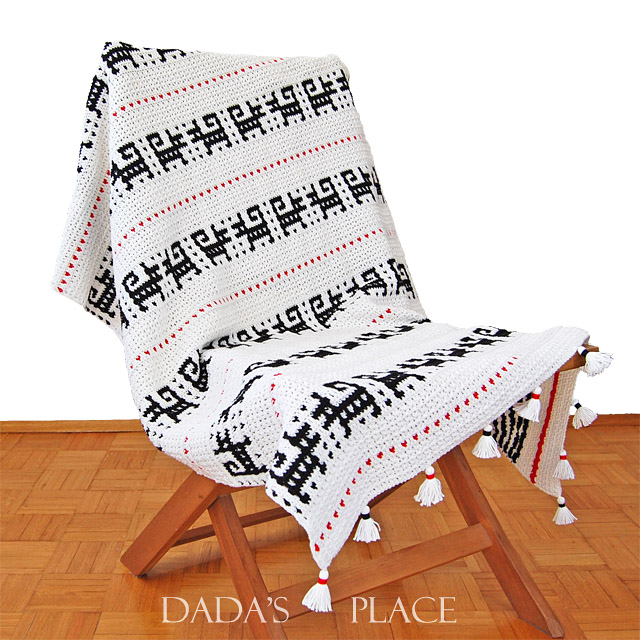
Today I’m very happy to introduce the new blanket in my quite a big blanket collection! I’m not sure if it’s my fifteenth blanket pattern, but I’m 100% sure that I put a lot of my time, hard work, effort, heart and soul into this pattern. It’s my first mosaic crochet pattern which I fell in love with 2-3 months ago when I tried it for the first time. It is a technique which allows you to do colorwork, carrying only one color at a time. You don’t have to switch colors all the time. It’s very convenient. Also it allows you to draw with your crochet hook, which I really like, because prior to being a crochet designer I had worked as an illustrator and graphic a designer. So, as you can guess, I love drawing and painting and playing with colors…

Mosaic crochet pattern Timi blanket 2

I named the blanket after my Tibetan terrier, Timi. He’s adorable, very loyal and funny. I call him my black and white shadow, because he follows me everywhere I go, all day long. If I’m working, he’s under my desk. If I’m taking a shower, he guards the bathroom door. If I go outside of the room, he immediately comes after me. Only sometimes (when he’s tired or just lazy) he waits several minutes to see if I’m coming back, and if I’m not, he comes to see what I’m doing, and why I’m not coming back. And he does it in such an unobtrusive way. He’s not boring or demanding at all. And he’s also very handsome and cute! So, it doesn’t come as a surprise that I adore him! I also love our morning and afternoon walks. I usually listen to one of my favorite podcasts, while he’s doing his stuff like sniffing, peeing on every other tree, bush or blade of grass, thoroughly marking the territory on our walk. As if he wants to say: I’ve been here.

Tibetan Terrier Timi

He likes dog treats very, very, very, very much, so a part of this pattern’s sales will help me to supply him with his favorite biscuits.

*

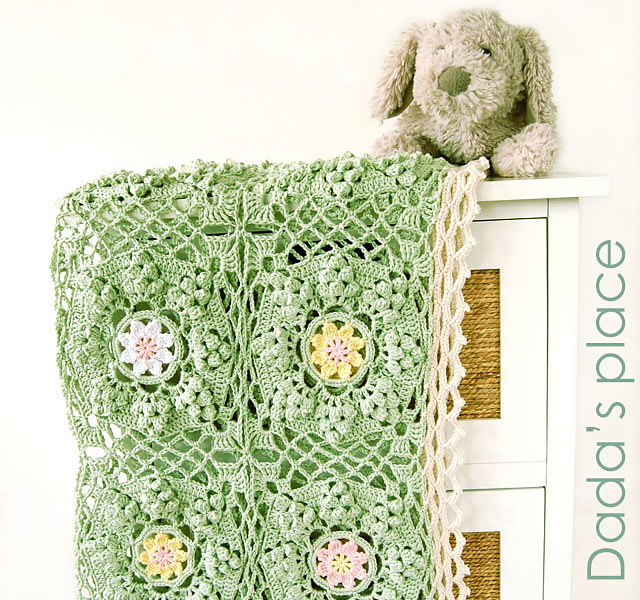
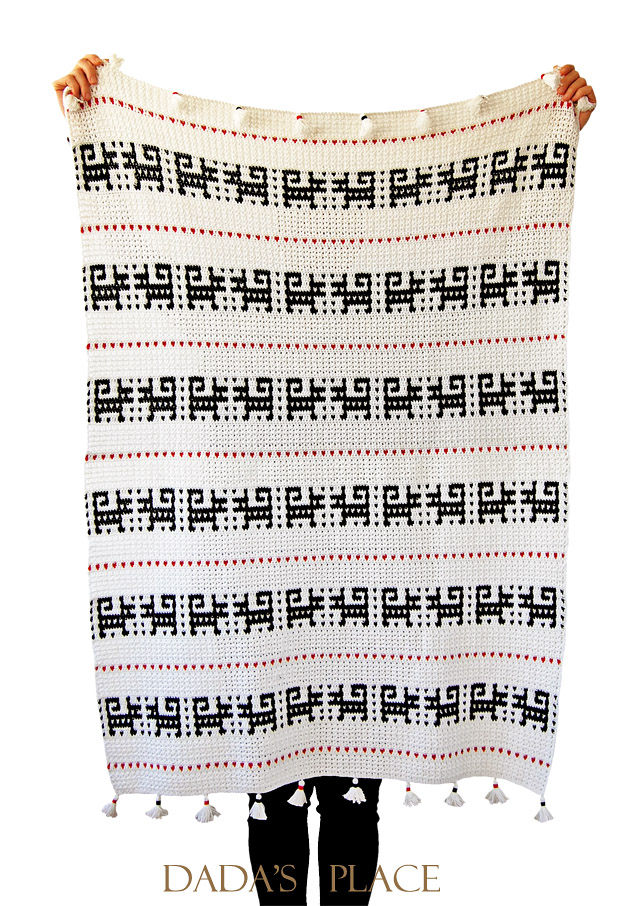
And now a word about the blanket. The size: 85 x 115 cm (33” x 45”). It’s easily adjustable. You just need to add or subtract (deduct) as many repeats as needed to suit your desirable size.

*

I used 100% cotton yarn Tango from St. George 125m/50g, which is between Sport (Baby) and Light worsted (DK) yarn. Since Tango yarn isn’t available online, you can substitute it with Catona yarn from Scheepjeswol, or Catania from Schachenmayr. They’re both 100% cotton yarns, the same weight as Tango, and they come in a variety of colors and shades.

Mosaic crochet blanket pattern by Dadas place

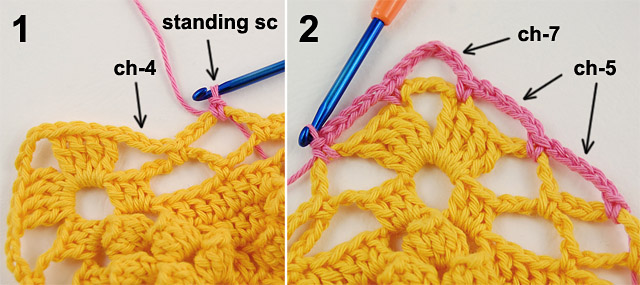
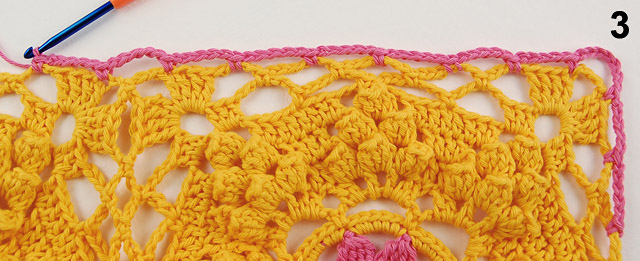
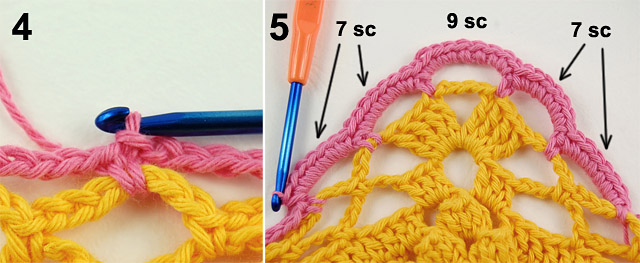
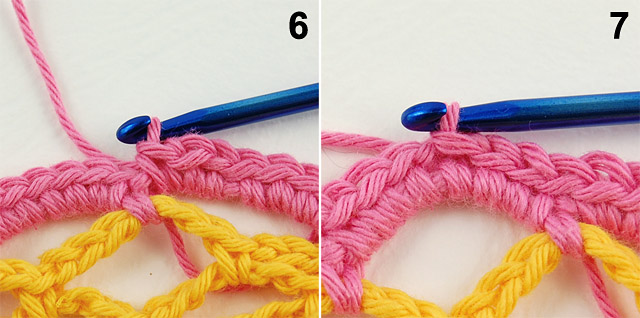
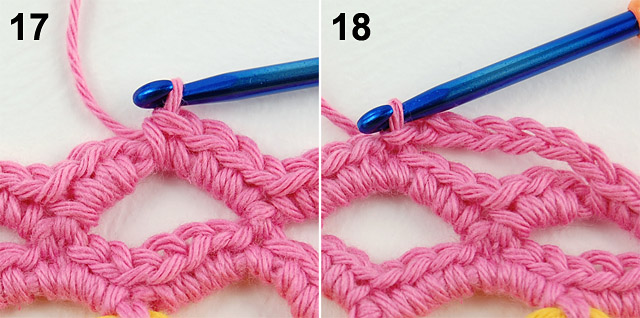
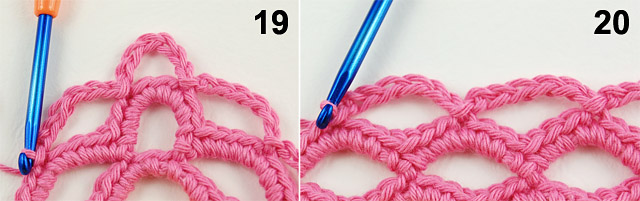
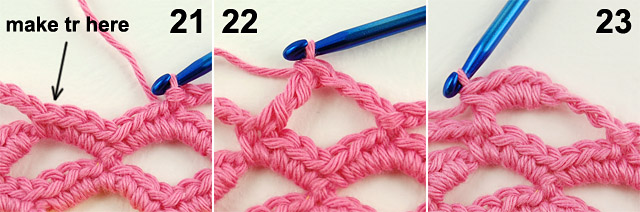
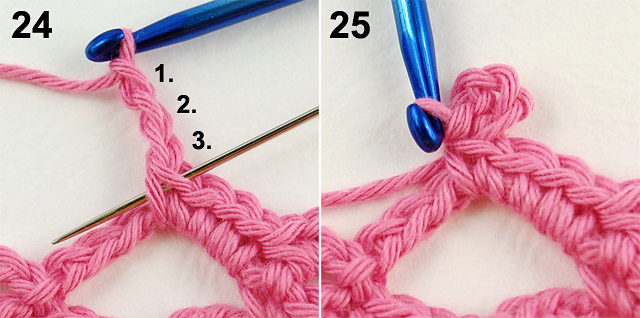
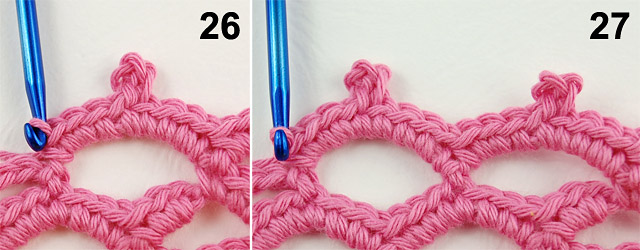
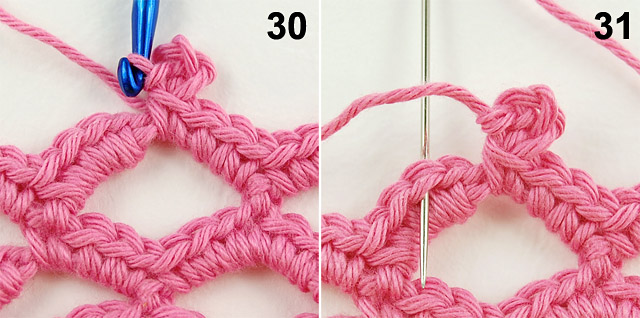
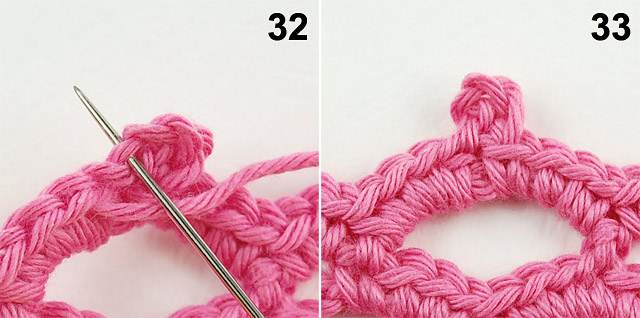
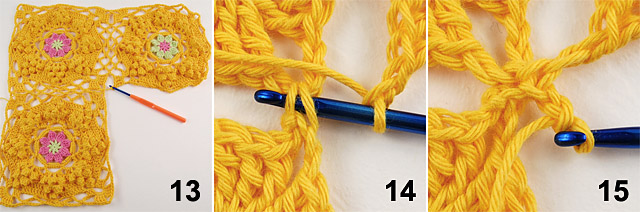
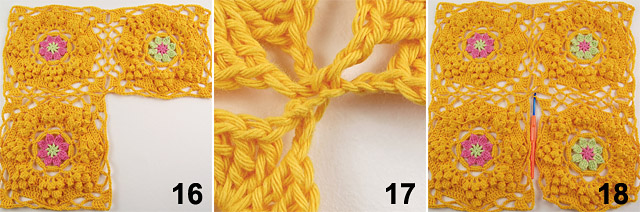
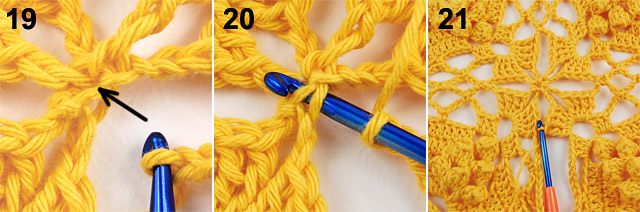
I used two different crochet hook sizes. A 3 mm for stitch pattern and a 3.5 for mosaic panels. It is quite a simple pattern and uses only three basic stitches: simple crochet, double crochet and chain stitch, and a special stitch: mosaic double crochet. That’s all. Mosaic double crochet isn’t complicated at all and I included a very detailed step-by-step picture tutorial on how to make it. So, you don’t have to worry if you’ve never tried mosaic crochet before.

Mosaic crochet blanket pattern by Dadas place 2

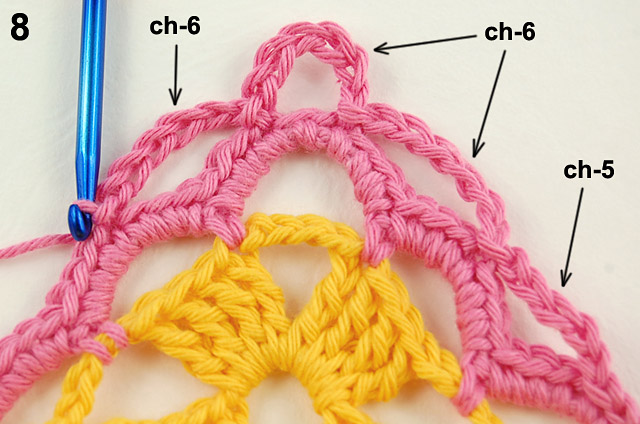
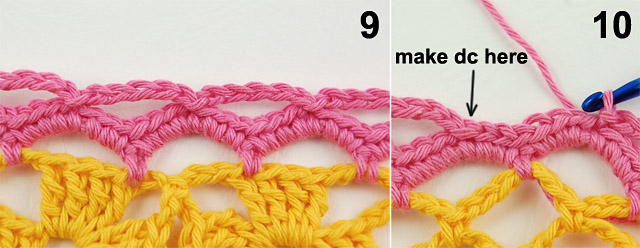
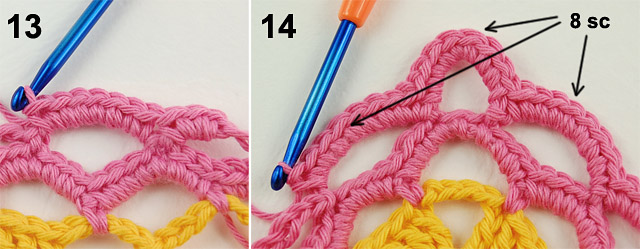
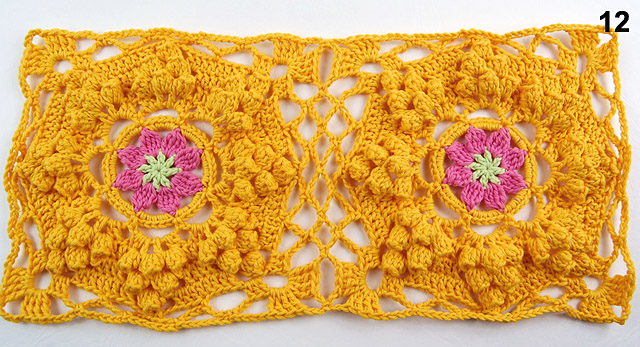
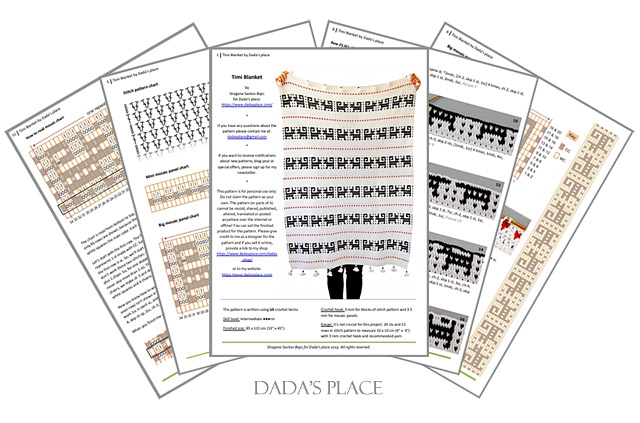
As always, the pattern is very detailed. There is a written pattern, a row-by-row mosaic panel picture tutorial, a step-by-step guide on how to make mosaic double crochet, a step-by-step photo tutorial on how to make the tassels, 5 crochet and mosaic charts, and a very detailed explanation on how to read a mosaic chart. All that packed in 12 page pattern.

Timi blanket Crochet mosaic blanket pattern

The blanket is very graphic and modern, which I really like, and it can be made in various colors. While choosing the yarn, make sure that you pick the colors that are contrasting enough. Don’t chose colors which have the same intensity of color. The best choice is one light and one dark color, whatever the actual colors are.

Mosaic crochet blanket pattern by Dadas place 3

The Timi blanket pattern is now available in Dada’s place shop, here, and you can purchase it also in Dada’s Ravelry shop and Dada’s Etsy shop as well.

*

I’m looking forward to seeing your versions of Timi blanket, so please share your pictures on Facebook and Instagram and don’t forget to tag me and to use #timiblanket hash tag.

*

Free Crochet Pattern: How to be a wildflower blanket (part 3)

21/09/2019 by Dada Filed Under: Crochet baby blanket patterns, Crochet blankets, Free crochet patterns Leave a Comment

How to be a wildflower blanket free crochet tutorial

And here it is, the final part of the How to be a Wildflower blanket tutorial. Hope you’ve already tried to make some squares and joined them together.

You can find the tutorial for the square here. When you learn how to make a square, click here to see how to join them together.

*

And now, we’re going to learn how to make this simple border.

Free Crochet border tutorial by dadas place

1. Start the border at the last ch-6 space before the left corner of the blanket. Make standing sc.

2. Make ch-5, sc into the next ch-4 space, ch-5, skip the next 3 tr, sc in the next tr, ch-7, sc in the next tr, ch-5, sc in the next ch-4 space;

Free crochet border tutorial by dadas place 2

3. *[ch-5, sc in the next chain-6 space] 3 times, ch-5, sc in the next ch-4 space, ch5, skip the next 3 tr, sc in the next tr, ch-5, sc in the next tr, ch-5, skip the next 3 tr, sc in the next ch-4 space; Repeat from * around the blanket. In corners repeat the procedure from picture 2.

Free crochet border tutorial by dadas place 3

4. When you reach the beginning of the row, join with slip stitch to standing sc.

5. Make 7 sc in the next 2 ch-5 spaces, 9 sc in the next ch-7 space (the corner), 7 sc in the next 2 ch-5 spaces;

Free crochet border tutorial by dadas place 4

6. Continue making 7 sc in each ch-5 space and 9 sc in corners, until you reach the beginning of the row.

7. Join with slip stitch to the next sc, and make slip st in the next 3 sc.

Free crochet border tutorial by dadas place 5

8. Make ch-5, skip the next 6 sc, sl st in the next sc, ch-6, skip the next 6 sc, sl st in the next sc,ch-6, skip the next sc, sl st in the next sc, ch-6, skip the next 6 sc, sl st in the next sc;

Free crochet border tutorial by dadas place 6

9. * ch-5, skip the next 6 sc, sl st in the next sc;

10. Repeat from * around the blanket; In corners repeat the steps from picture 8;

Free crochet border tutorial by Dadas place 7

11. When you reach the beginning of the row, make ch-3, dc in the fourth sl st (look at the previous picture);

12. Begin the next row by making 3 sc over the post of dc we’ve just made;

Free crochet blanket and border pattern

13. Make 7 sc in the next ch-5 space;

14. Make 8 sc in the next 3 ch-6 spaces;

Free crochet blanket tutorial by dadas place

15. Continue making 7 sc in each ch-5 space and 8 sc in ch-6 spaces of the corners,

16. until you reach the beginning of the row.

Free crochet blanket pattern and step by step tutorial by dadas place

17. Make 4 sc in the next ch-3 space.

18. make ch-6, skip the next 6 sc, sl st in the next sc;

Free crochet baby blanket step by step tutorial by dadas place

19. ch-6, skip the next 6 sc, sl st in the next sc, ch-6, skip the next 6 sc, sl st in the next sc, ch-6, skip the next 2 sc, sl st in the next sc, ch-6, skip the next 6 sc, sl st in the next sc;

20. *ch-6, skip the next 6 sc, sl st in the next sc; Repeat from * around the blanket. In corners repeat the steps from the previous picture;

Free crochet blanket pattern and step by step tutorial

21. until you reach the beginning of the row;

22. make ch-3, skip the next 6 sc, make tr in the next sc;

23. work 4 sc over the post of tr you’ve just made;

Free How to be a wildflower blanket pattern

24. make 4 sc in the next ch-6 space. Now, we’re going to make a picot stitch, so make ch-3. The needle indicates where you should make sl st, it’s the fourth stitch from the hook.

25. Insert the hook through both loops of that stitch, yo and draw the yarn through the stitch and through the loop on your hook.

How to be a wildflower blanket free crochet pattern

26. Make 4 sc in the same space;

27. * make [4 sc, picot, 4 sc] in the next ch-6 space; repeat from * around the blanket,

How to be a wildflower crochet blanket free pattern

28. and in corners,

29. until you reach the beginning of the row.

Free crochet tutorial by Dadas place How to be a wildflower blanket

30. Make 4 sc in the last chain space, then picot stitch.

31. Now, we’re going to make an invisible join, so cut the yarn and pull it through the stitch. Thread the tapestry needle. Skip the first sc, and insert your needle through both loops of the next sc, from back to front and pull it through.

Free crochet blanket pattern and step by step tutorial by dadas place

32. Insert your needle back through the last stitch you made, through back loop only and pull it through.

33. Wave in the yarn end.

*

Hope you’ll like the tutorial. If you make your own How to be a wildflower blanket please share it on Facebook or Instagram using #howtobeawildflowerblanket hashtag.

How to be a wildflower blanket free crochet pattern by dadas place

I would really, really, really appreciate it if you also added your finished blanket into your Ravelry projects. I will chose the best photos and post it among the other pictures on the pattern page, so everybody will be able to see it.

*

This pattern is written & designed by me, Dragana Savkov Bajic. Please do not claim the pattern as your own, do not share, translate, or publish this pattern or parts of this pattern anywhere without my permission. You can sell the finished product for this pattern. Please give credit to me as a designer for the pattern and if you sell them online, please provide a link to my website.

*

The first part of the tutorial: How to make the square is available here.

The second part of the tutorial: How to join the squares is available here.

Free crochet blanket patterns by dadas place

Click here to check out my other free crochet patterns and step-by-step tutorials.

Free Crochet Pattern: How To Be a Wildflower Blanket (part 2)

03/09/2019 by Dada Filed Under: Crochet blankets, Free crochet patterns 2 Comments

How to be a wildflower blanket

As I promised in my last blog post, today I’ll show you how to join the squares together. If you missed the first part of the tutorial (how to make the square) click here to check it out.
*
I will use only 4 squares to demonstrate the join-as-you go method. Also the colors I use differ from the actual blanket. Don’t let that confuse you.

Free pattern How to be a wildflower blanket 1

1. After you finish the first complete square, start doing the second, but complete only the first nine rounds. Work through the tenth round, as explained earlier,

2. and stop once you’ve worked the fourth tr of the first corner, then make ch-2;

Free pattern How to be a wildflower blanket 2

3. Take your first finished square and lean it against the second square. We will start joining the squares at corners.

Free pattern How to be a wildflower blanket 3

4. Insert the hook into ch-4 space of the upper right corner of the first square, grab the yarn with your hook,

5. pull the yarn through ch-4 space and through the loop on your hook. We’ve just made our first join, using slip stitch.

6. Make ch-2, 4 tr in ch-4 space of the second square;

Free pattern How to be a wildflower blanket 4

7. make ch-2, sl st in the next ch-4 space of the first square, ch-2, sc in the next ch-6 space of the second square;

8. * ch-3, sl st in the next ch-6 space of the first square, ch-3, sc in the next ch-6 space of the second square;

9. Repeat from * two more times;

Free pattern How to be a wildflower blanket 5

10. ch-2, sl st in the next ch-4 of the first square, ch-2, 4 tr in the next ch-4 space of the second square;

11. Now, we’re going to join our second corner, so make ch-2, sl st in the next ch-4 space of the first square, ch-2, 4 tr in the same ch-4 space of the second square where we’ve just made 4 tr;

Free pattern How to be a wildflower blanket 6

12. Continue the last round of the second square as you normally would. When you finish joining your first 2 squares, they should look like this. Now we’re going to join our third square. Join the third square in the same way we joined our first 2 squares together earlier,

Free pattern How to be a wildflower blanket 7

13. and stop once you’ve made the fourth tr and ch-2 of the second corner.

14. Insert your hook in slip stitch with which we joined our first and second squares together,

15. grab the yarn and pull it through slip stitch and through the loop on your hook, then make ch-2;

Free pattern How to be a wildflower blanket 8

16. Continue the last round of the third square as you normally would.

17. This is how the join of the three squares should look like.

18. Take the fourth square and repeat all the steps we made with the third square. Again, when you reach the second corner (4 tr and ch-2) stop to see where you should make a join.

Free pattern How to be a wildflower blanket 9

19. The arrow in the picture indicates where you should make a join.

20. Insert your hook into the stitch, yo and pull the yarn through the stitch and through the loop on the hook.

21. Continue the last round of the fourth square as you normally would. See how the join of our four squares looks nice and neat.

Free pattern How to be a wildflower blanket 10

Now, when you learned how to join the squares together, you can continue to join the rest of your squares in the same way.

*

In the third part of the tutorial I will show you how to make the border.

How to be a wildflower blanket free pattern

*

You can check out the first part of the tutorial here.

*

Update: The third part of the tutorial – How to make the border is now available HERE.

  • « Previous Page
  • 1
  • 2
  • 3
  • 4
  • …
  • 8
  • Next Page »

Dada's shop


Copyright © 2023 · Dadas Place.com