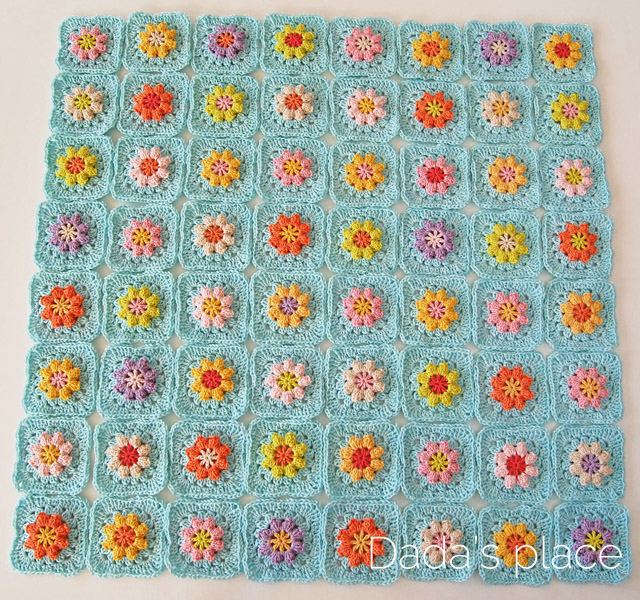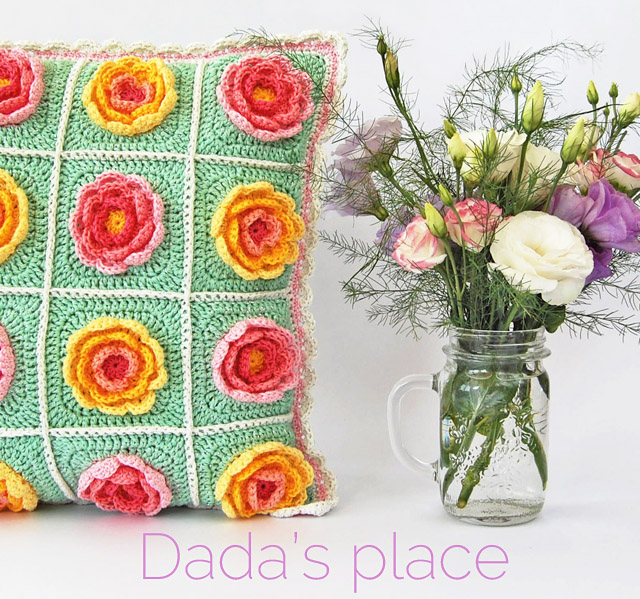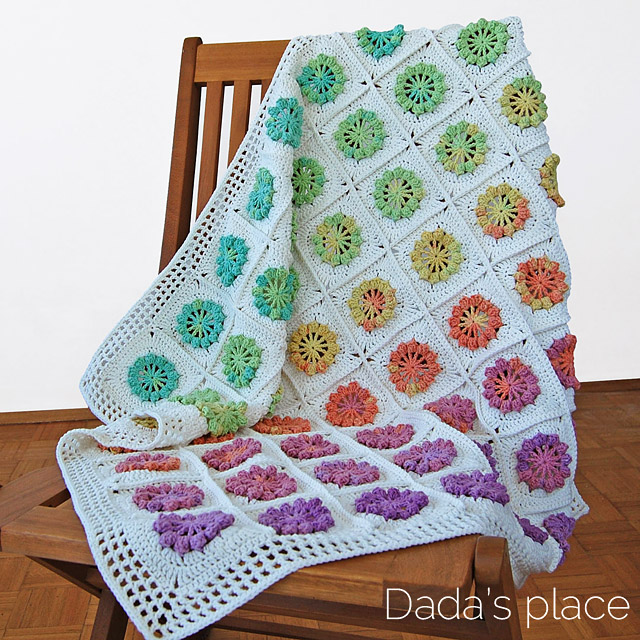
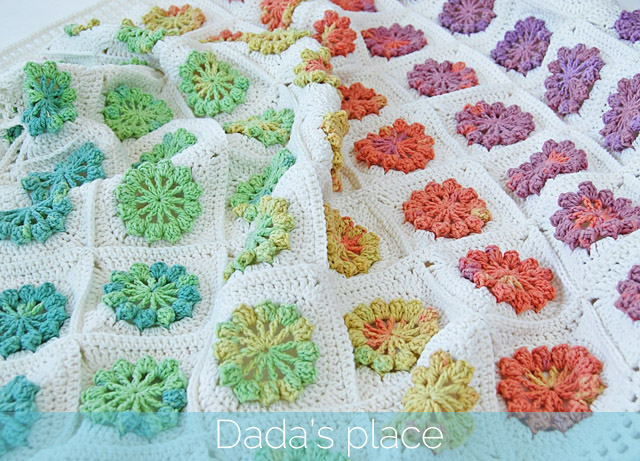
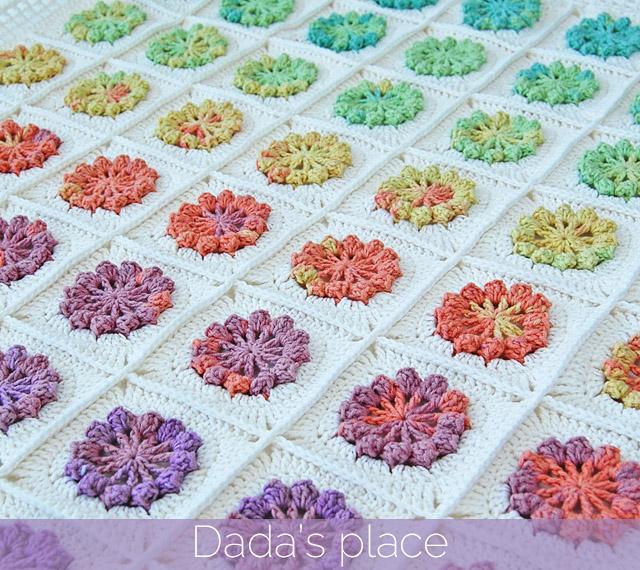
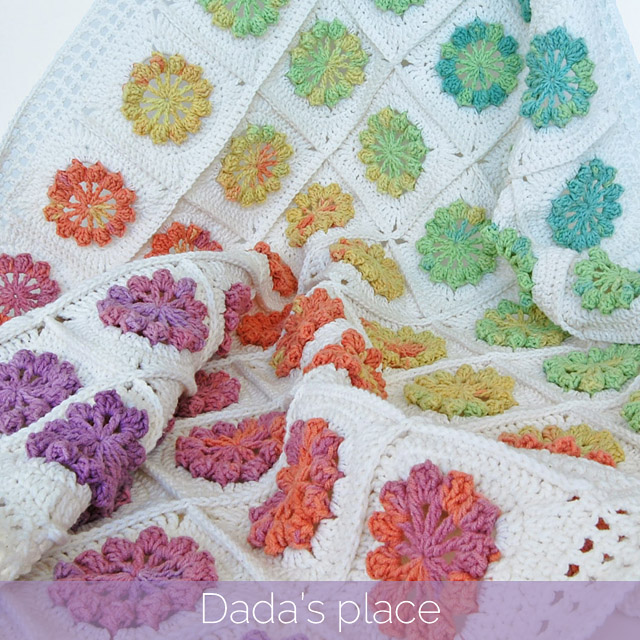
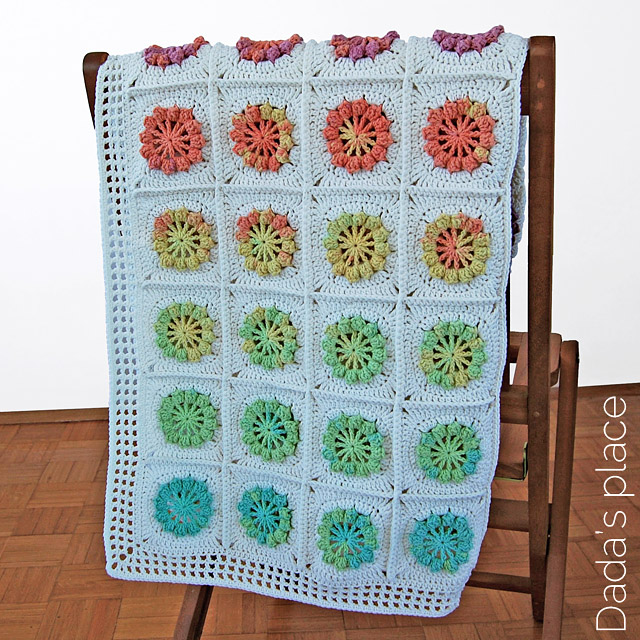
I named this blanket “The Whisper Of Joy” because it reminds me of childhood, of that carefree time when joy was an important part of almost every long, seemingly endless day. So, I tried to bring you at least a little joy with this colorful and easy to make free blanket pattern.

This blanket is made of 64 granny squares. Each square has only four rows. The squares are joined with single crochet. The border is very simple and has 5 rows.
This tutorial is written in US crochet terms.
Skill level: Advanced beginner – Intermediate
Yarn: Alize
● 2 skeins of Alize Cotton Gold Batik 3304 – color A (100g/330m 3.53Oz/361yds)
● 3 skeins of Alize Cotton Gold 62 – color B (100g/330m 3.53Oz/361yds)
Crochet hook: 4 mm (US – G / 6)
Size: 82 cm (32”) x 82 cm (32”)
Gauge: the square measures 10 cm (4”) x 10 cm (4”)
Stitch guide:
Chain stitch (ch): Yarn over, draw yarn through loop on hook.
Slip stitch (slip st): Insert the hook into stitch, yarn over and draw yarn through stitch and through loop on your hook.
Single crochet (sc): Insert hook into stitch, yarn over, pull up a loop, yarn over, and draw yarn through both loops on hook.
Half double crochet (hdc): Yarn over, insert hook into stitch, yarn over, pull up a loop, yarn over, and draw yarn through three loops on hook.
Double crochet (dc): Yarn over, insert hook into stitch, pull up a loop (three loops on hook), yarn over, draw yarn through two loops, yarn over, draw yarn through two remaining loops on hook.
Treble crochet (tr): Yarn over twice, insert hook into stitch, pull up a loop (four loops on hook), yo, draw yarn through two loops (three loops on hook), yo, draw yarn through two loops (two loops on hook), yo, draw yarn through two remaining loops on hook.
5 dc Popcorn stitch: ch-3, make 4 dc in same space, drop loop from hook, insert hook from front to back between ch-3 and first dc, grab dropped loop, yarn over, draw yarn through two loops on hook.
Standing single crochet: Make a slip knot on your hook. Insert hook into stitch, yarn over, pull up a loop, yarn over, and draw yarn through both loops on hook.
So, let’s get started!

With Color A: We will start with a magic ring. Make ch-5 in the ring. (counts as tr + ch-1) – Picture 1
Make * tr, ch-1 in the ring. – Picture 2
Repeat from * ten more times; you should have 12 tr, ch-1 between each tr. – Picture 3
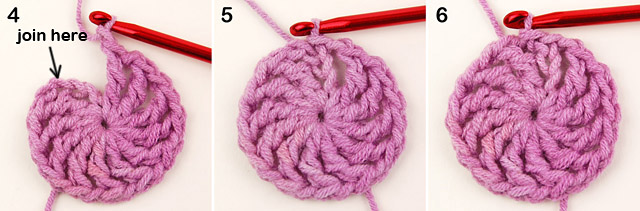
Pull the yarn tail and close the ring. – Picture 4
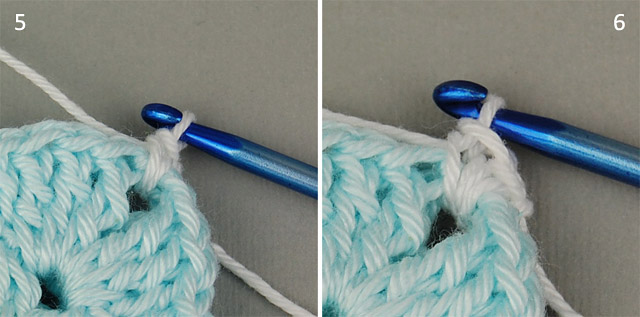
Join with slip st to the fourth chain of the initial ch-5. – Picture 5
Make slip st in the next ch-1 space. – Picture 6

Make ch-3. Now, we’re going to make a beginning popcorn stitch. – Picture 7
Make 4 dc in the same space; – Picture 8
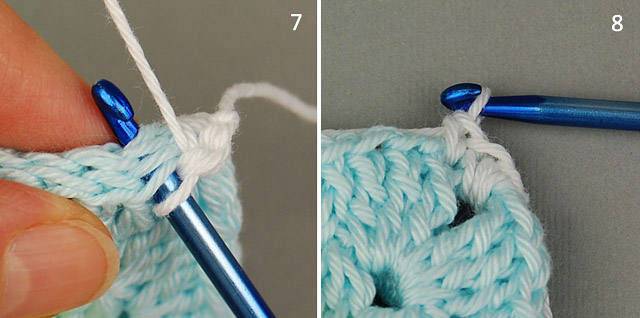
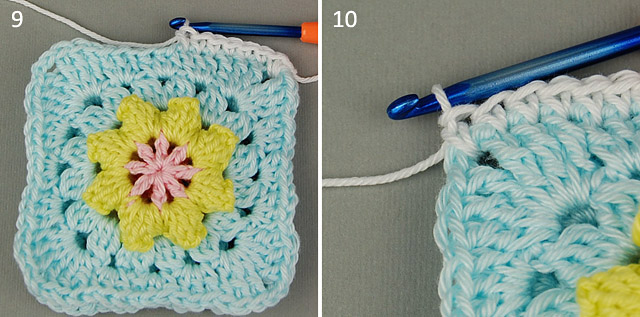
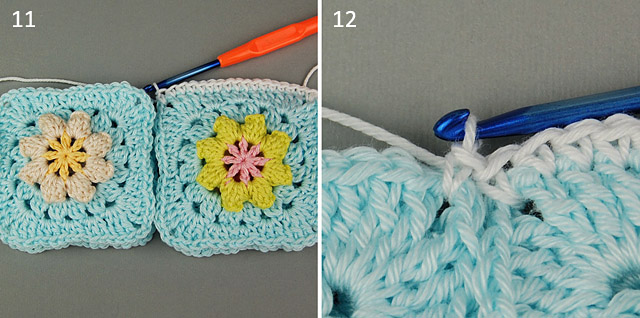
Drop the loop from your hook and insert it into the third chain of the initial ch-3. – Picture 9
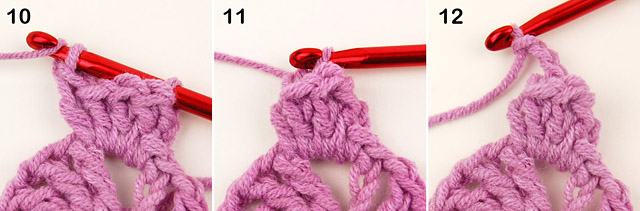
Grab the dropped loop with your hook, yarn over, – Picture 10
and pull the yarn through both loops on the hook. The first popcorn is finished! – Picture 11
Make ch-3, – Picture 12
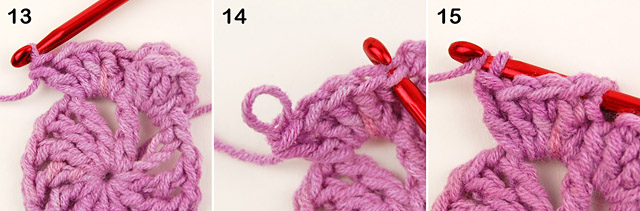
then 5 dc in the next ch-1 space; – Picture 13
Drop the loop from your hook and insert it under both loops of the first dc of the group of 5 dc; – Picture 14
Grab the dropped loop, yarn over, – Picture 15

and draw the yarn through both loops on your hook; make ch-3; – Picture 16
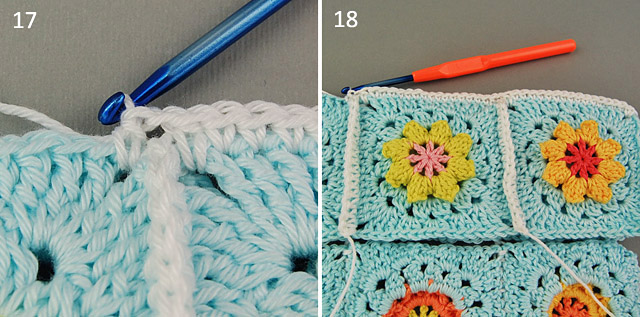
Make * 5 dc popcorn stitch in the next ch-1 space, ch-3; – Picture 17
Repeat from * nine more times; – Picture 18
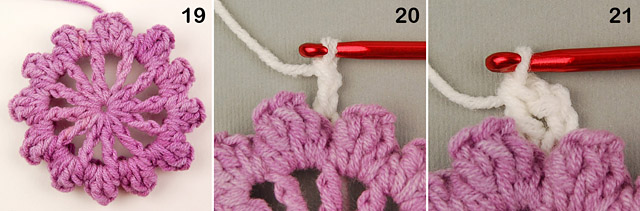
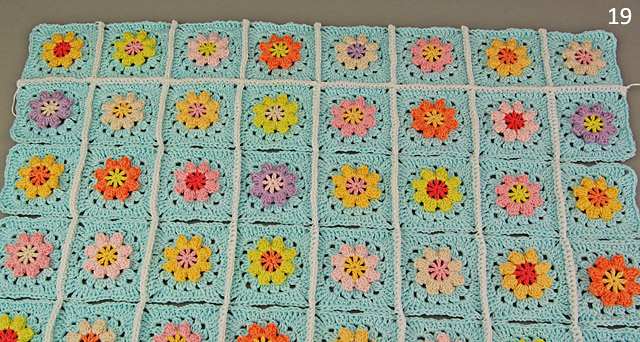
Join with slip st to the top of the beginning popcorn. You should have 12 popcorns with ch-3 between each popcorn. – Picture 19
Insert Color B into any ch-3 space and make ch-3; – Picture 20
make dc in the same space; – Picture 21
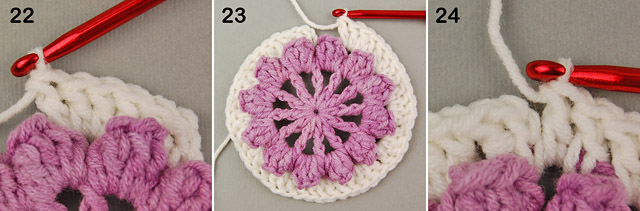
make 4 dc in the next ch-3 space; – Picture 22
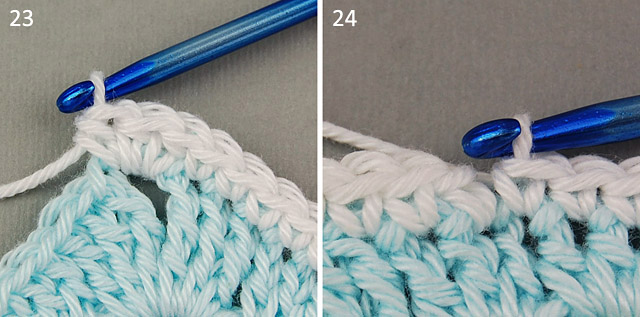
Continue making 4 dc into each ch-3 space, until you reach the beginning of the round; – Picture 23
make 2 dc in the first ch-3 space where you’ve already made ch-3 and dc; (48 dc) – Picture 24
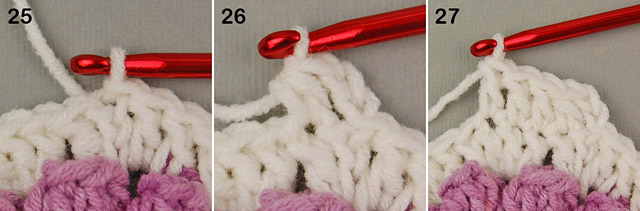
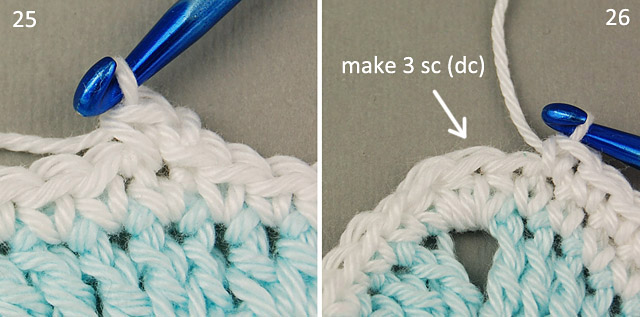
Join with slip st to the top of the initial ch-3; – Picture 25
make ch-2 (counts as hdc), then hdc in the next dc; – Picture 26
make dc in the next 3 dc; – Picture 27
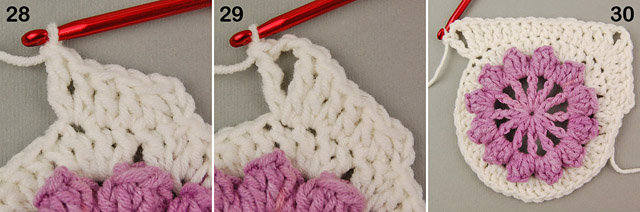
make tr in the same stitch, where you’ve just made dc; – Picture 28
(tr, ch-2, tr) in the next dc; – Picture 29
make * (tr, dc) in the next stitch, dc in the next 2 dc, hdc in the next 5 dc, dc in the next 2 dc, (dc, tr) in the next dc, (tr, ch-2, tr) in the next dc; – Picture 30
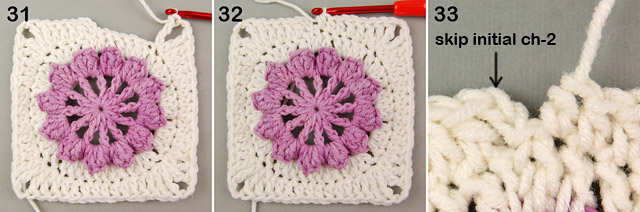
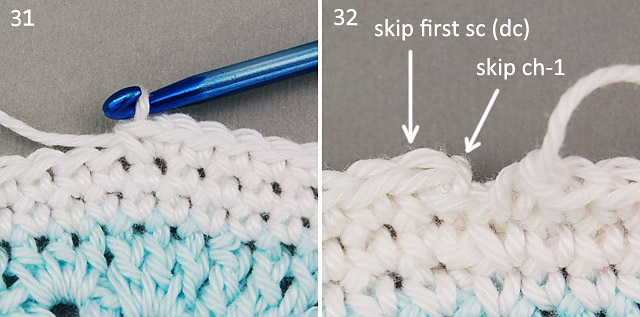
repeat from * two more times; – Picture 31
make (tr, dc) in the next dc, dc in the next 2 dc, hdc in the next 3 dc; – Picture 32
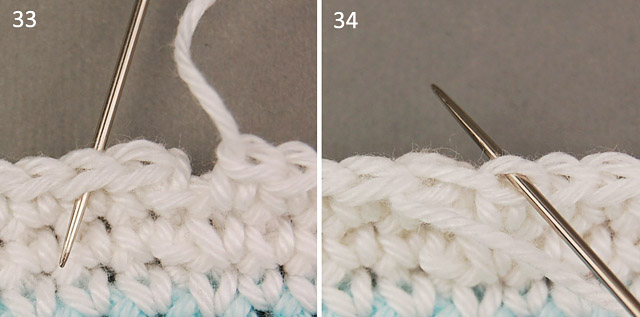
Now, we’re going to make an invisible join. Cut the yarn and pull it through the stitch. – Picture 33
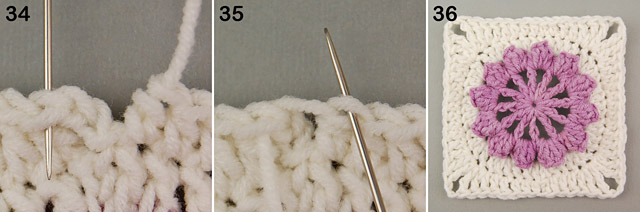
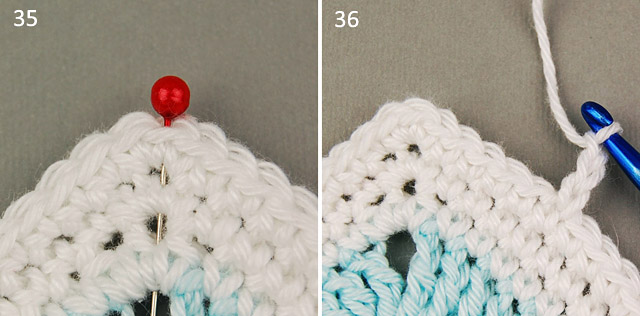
Thread the tapestry needle. Skip the initial ch-2 and insert your needle under both loops of the next hdc, from back to front and pull it through. – Picture 34
Insert your needle back to the last hdc you made, through the back loop only and pull it through. – Picture 35
Weave in the yarn end.
The finished square! – Picture 36

How to join the squares
● When you finish all 64 squares needed for the blanket, it’s time to join them together. We’re going to join our squares with single crochet.
● We will first join together all the horizontal rows, and then all the vertical rows.
● We’ll start from the top right-hand corner and we’ll join the squares together from right to left.
● I decided to join my squares with the same color I used for the background, but you can choose to use some contrast color, and make the blanket even more interesting and unique.
● For the best result block your squares before joining.
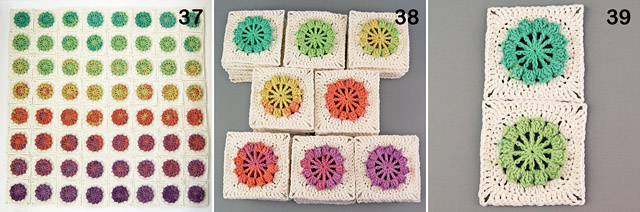
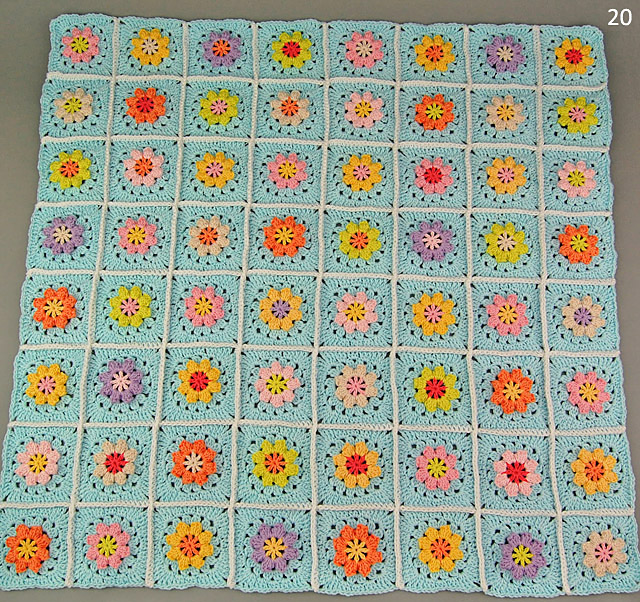
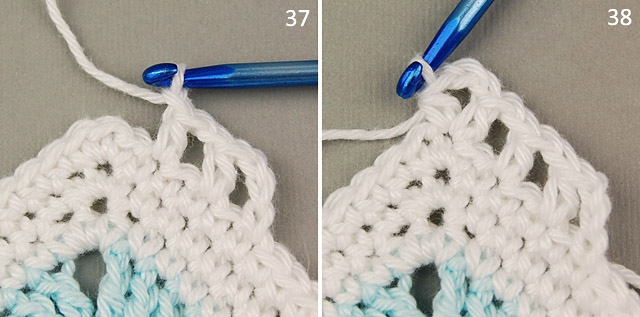
Lay out your squares in the way you want them to appear on the blanket. – Picture 37
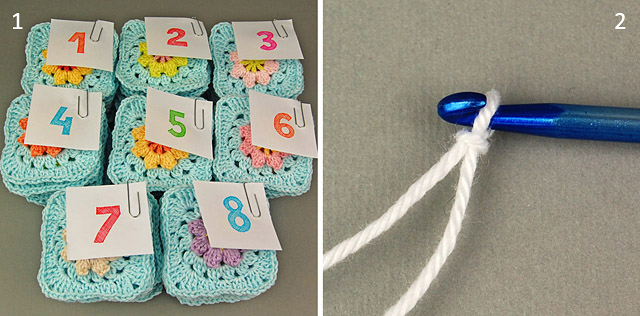
I like to make a pile of squares for each row – so I don’t have to think about which square I should join next. – Picture 38
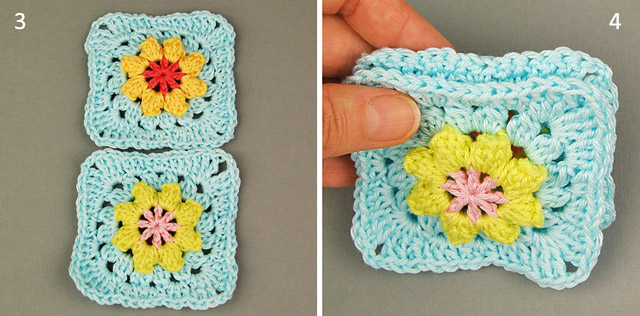
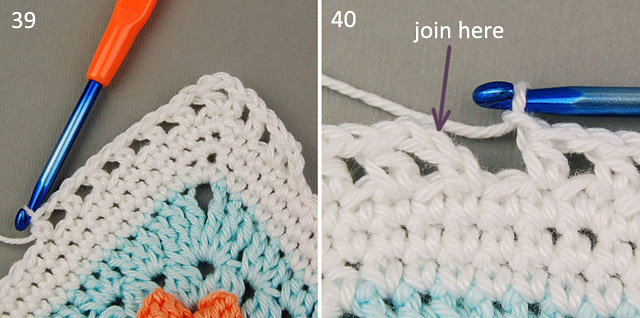
Now, we’re going to join our first two horizontal rows together, so, take the first two squares, one from the first pile and one from the second pile. – Picture 39
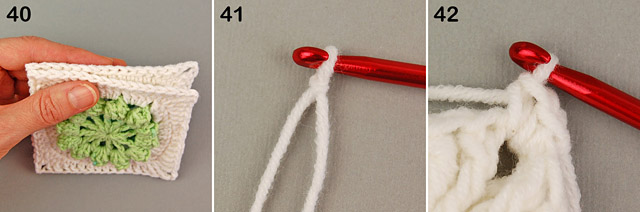
Put them together – facing wrong sides together. Line up your squares so the edges and stitches match. – Picture 40
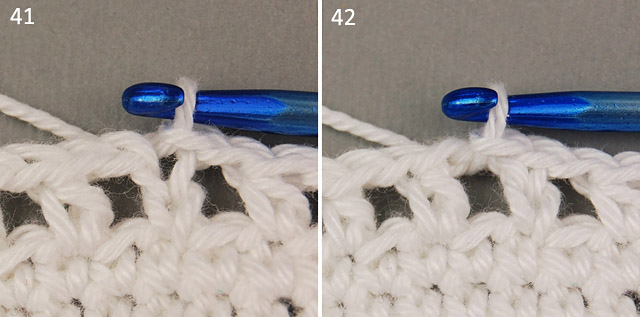
Make a slip knot on your hook, because we’re going to make a standing single crochet. – Picture 41
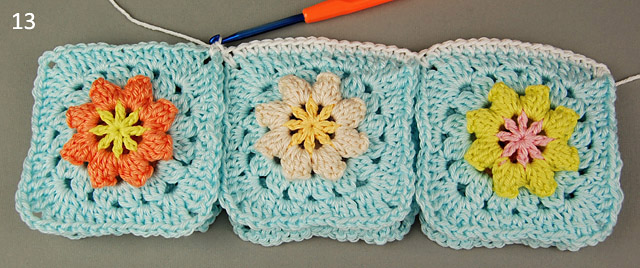
Insert the hook from front to back through ch-2 space of both squares, and make standing sc (yo, pull up a loop, yo, and draw the yarn through both loops on your hook). Make sc in the same space. – Picture 42
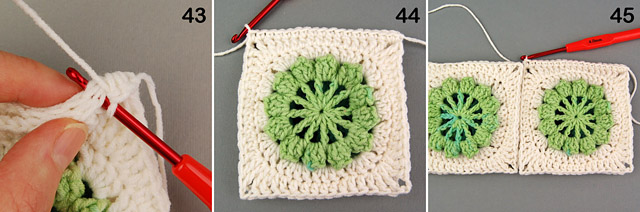
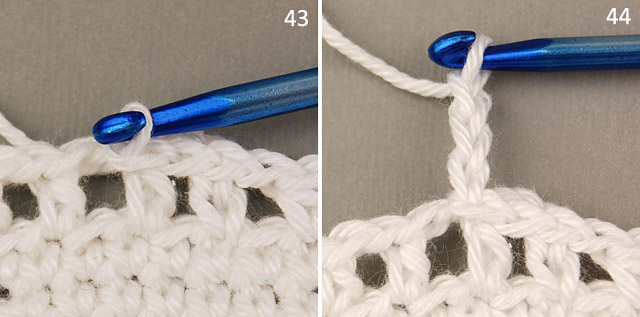
Now, we’re going to make sc in the next stitch. Be sure to pull the hook through both squares, and both loops – front and back. – Picture 43
Work 1 sc in each stitch until you reach the left corner of the square. Make 1 sc in ch-2 space. – Picture 44
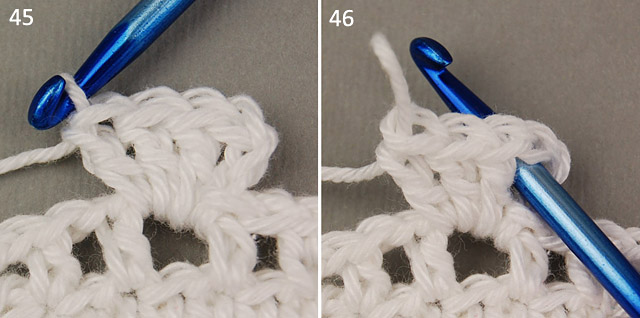
Take the next two squares facing wrong sides together and lean them against the first two squares. – Picture 45
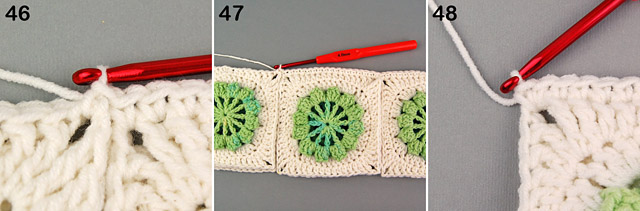
Keeping them close together, make 1 sc in ch-2 space. – Picture 46
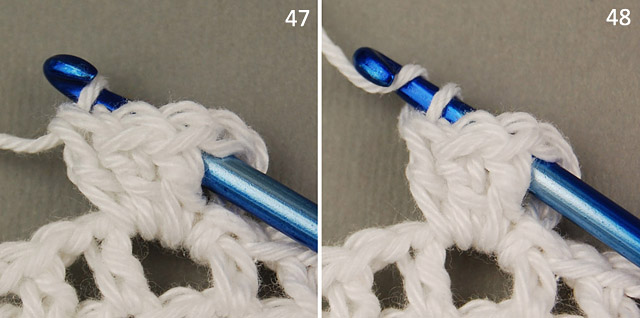
Keep working 1 sc in every stitch. When you’ve joined the second pair of squares, take another 2 and repeat the procedure until you join all 8 pairs of squares. – Picture 47
When you reach the corner of the last pair of squares, make 2 sc in ch-2 space. Fasten off. – Picture 48
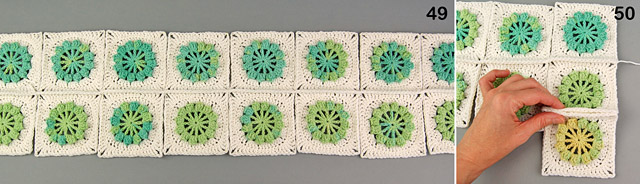
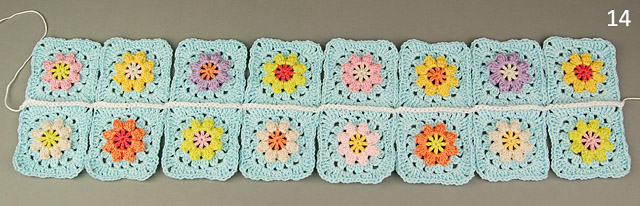
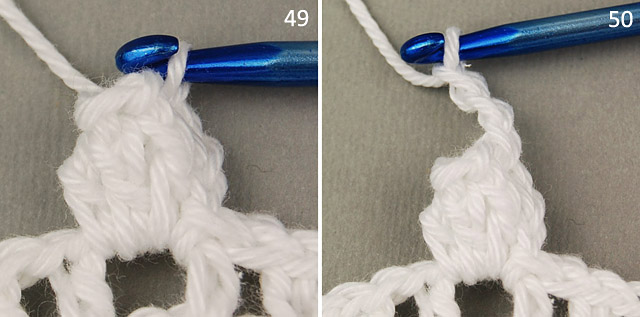
These are our two first horizontal rows joined together. – Picture 49
Now, we will join the third row to the second one.
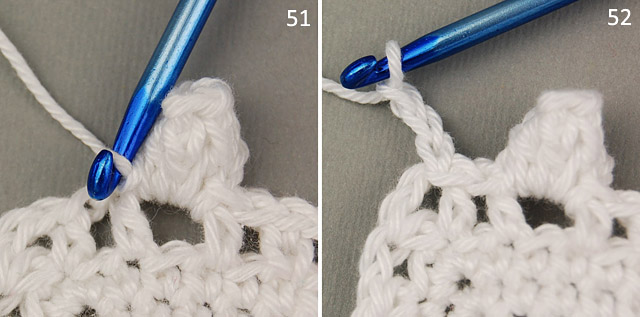
Take a square from your third pile and hold it against the first square of the second row, facing wrong sides together. – Picture 50

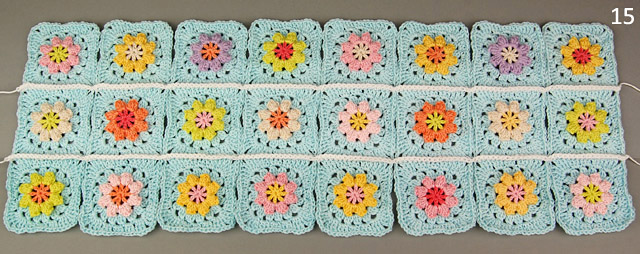
Make standing sc in ch-2 of the corner, then 1 sc in the same space. Continue joining the third row in the same way you joined the first two horizontal rows. Don’t forget to make 2 sc in the left corner of the last pair of squares. – Picture 51
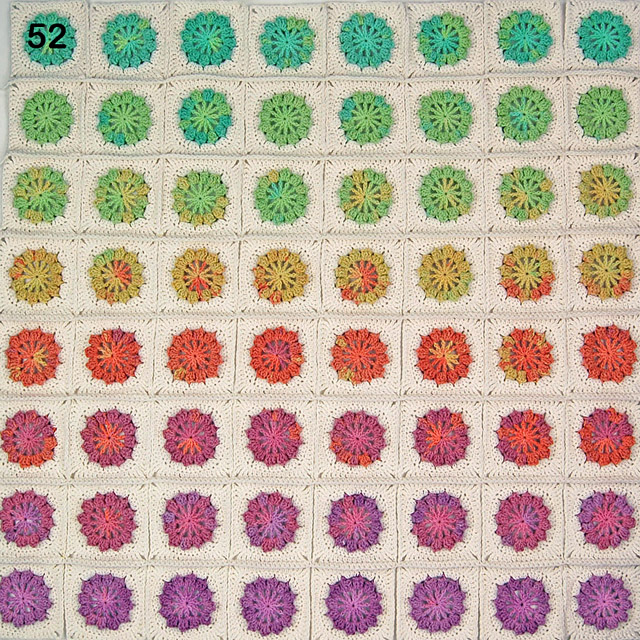
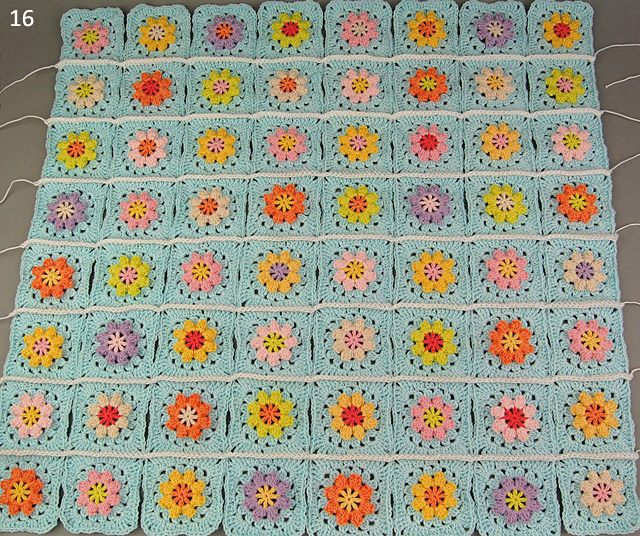
Continue joining horizontal rows in the same way you’ve already joined your first three rows. To finish joining all 8 horizontal rows, you need to repeat this procedure five more times. – Picture 52
We will join the vertical rows in the same way we joined the horizontal rows. We’ll work from right to left. Start with the squares in the upper right hand corner.
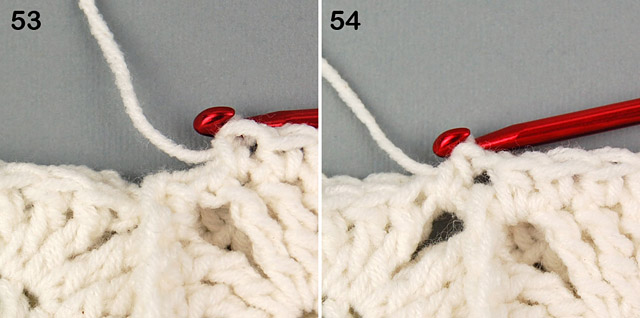
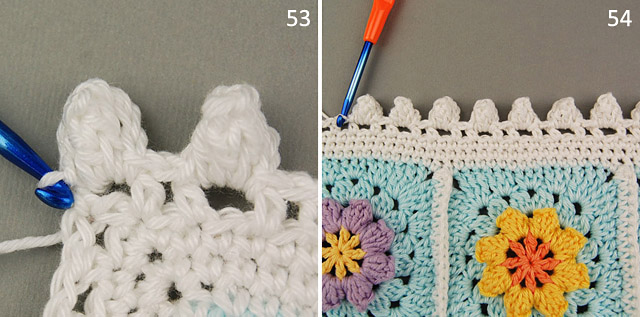
Make standing sc in ch-2 space of the corner, sc in the same space, work 1 sc in each stitch, until you reach the join of two squares; – Picture 53
make 1 hdc in the last stitch before the join, ch-1, 1 hdc in the first stitch after the join. – Picture 54
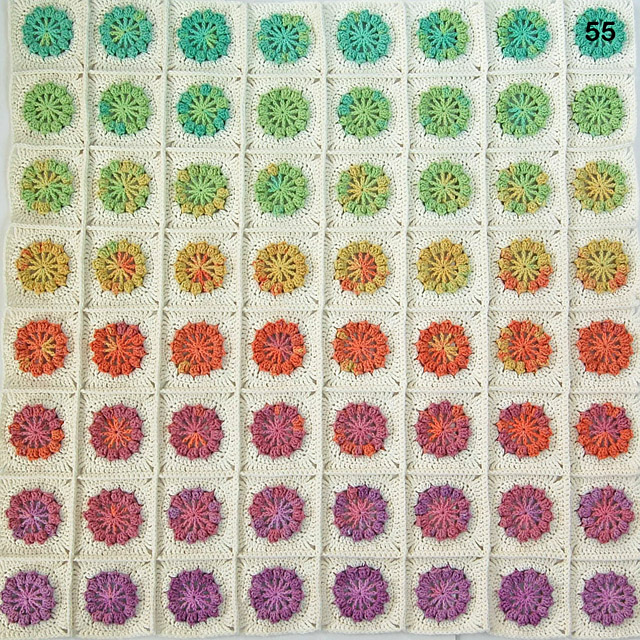
Continue joining the squares until you join together all of your vertical rows. Don’t forget to make 2 sc in the left corner of the last pair of squares of each row. Weave in the yarn ends. – Picture 55
Now, we just have to make our simple border.
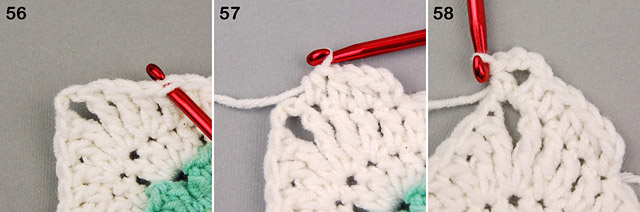
We will start the border in the fourth stitch to the right of the left corner. – Picture 56
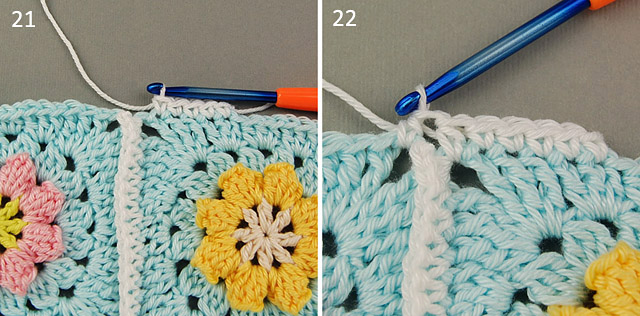
Attach the yarn and make ch-2 (counts as hdc), make hdc in the next three stitches; – Picture 57
make (hdc, ch-3, hdc) in the next ch-2 space; – Picture 58
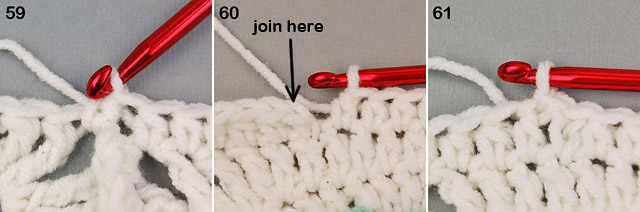
Continue making 1 hdc in each stitch. When you reach the join of two squares, make hdc in the last stitch before the join, and hdc in the first stitch after the join. – Picture 59
Make 1 hdc in each stitch around the blanket, in the corners make: (hdc, ch-3, hdc) in ch-2 space. – Picture 60
When you reach the beginning of the row, join with slip stitch to the top of the beginning ch-2; make slip stitch in the next hdc. – Picture 61
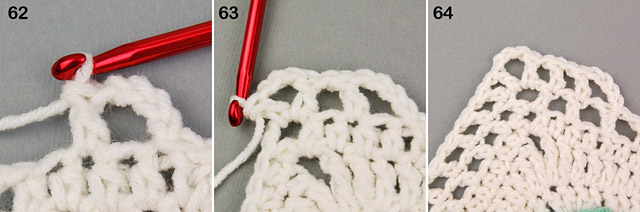
make ch-4 (counts as dc + ch-1), skip the next hdc, make dc in the next hdc; – Picture 62
ch-1, skip the next hdc, (dc, ch-3, dc) in the next ch-3 space; – Picture 63
* ch-1, skip the next hdc, dc in the next hdc; repeat from * around the blanket. In the corners make (dc, ch-3, dc) in ch-3 space. When you reach the beginning of the row, ch-1, join with slip st to the third chain of the initial ch-4; we’ve just completed the second row of the border. The third row is the same as the second, so make ch-4 (counts as dc + ch-1), skip the next ch-1 space, dc in the next dc; work ch-1, skip the next ch-1 space, dc in the next dc around the blanket. In the corners make: (dc, ch-3, dc) in ch-3 space. – Picture 64
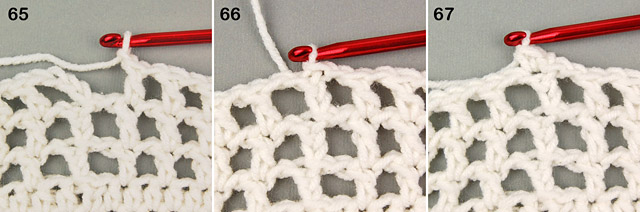
When you reach the beginning of the row, join with slip st to the third chain of the initial ch-4, then repeat the third row. – Picture 65
Join with slip st to the third chain of the initial ch-4; – Picture 66
Now, we’re going to make a simple row of single crochet along the blanket.
make ch-1, sc in the same stitch; – Picture 67
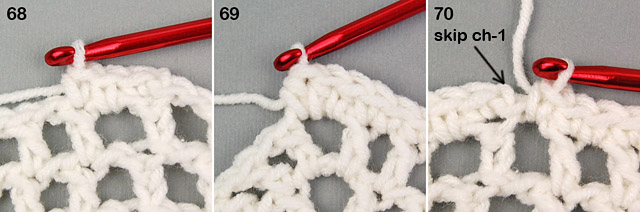
* make sc in the next ch-1 space, sc in the next dc; repeat from * around the blanket; – Picture 68
in the corners make 3 hdc in ch-3 space; – Picture 69
We will finish the blanket with an invisible join, so cut the yarn and pull it through the stitch. Thread a tapestry needle. – Picture 70
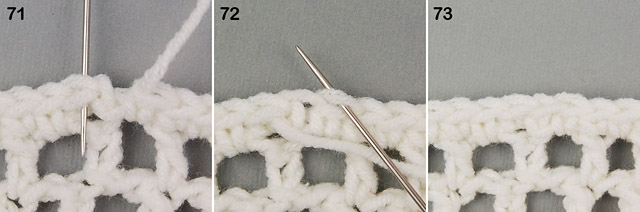
skip ch-1 and insert your needle under both loops of the next sc, from back to front and pull it through; – Picture 71
insert your needle into the last sc you made, in back loop only, from front to back and pull it through. – Picture 72
This is how my invisible join looks. – Picture 73
Feel free to sell the finished products made from this pattern, but please link back to my site: dadasplace for credit. And, please don’t use my pictures to sell your work.
Although this pattern is free, it is copyright protected, so please don’t sell or publish this pattern anywhere, don’t translate it, or make YouTube videos without my permission. Thank you for respecting my work!
Hope you will like the pattern, and maybe will try it out! If so, I would love to see it! Please be free to share it to my Facebook page, or on Instagram, and use hash tag #whisperofjoyblanket. I’m looking forward to seeing your beautiful creations, and that will bring me a lot of joy!