• Facebook
  • Instagram
  • Pinterest

Dada's Place

Crochet wonderland

  • Home
  • Blog
  • Dada’s shop
  • Free Patterns
  • Categories
  • About
  • Contact

Free Crochet Pattern: Norwegian Forest Blanket

10/07/2019 by Dada Filed Under: Crochet blankets, Free crochet patterns 40 Comments

Free crochet blanket pattern by dadas place

This week is my birthday. When I was a child my birthday and New Year’s Day were my 2 favorite days in a whole year. Growing older I stopped being so excited about my birthday. Don’t know why. When I gave birth to my son, I almost completely neglected to celebrate my birthday. It became an ordinary day. But recently, I started to appreciate much more everything relating to myself. I stopped seeing myself only as my son’s mother, or my husband’s wife, or my father’s daughter. It somehow became enough simply being Dragana. I became excited about my birthday again. So, to celebrate it I want to give you something. I know that everybody like free crochet patterns, so I decided to publish one of my paid patterns for free, here on my blog. It’s my gift to you.

So, let’s get started!

Norwegian forest blanket free crochet pattern

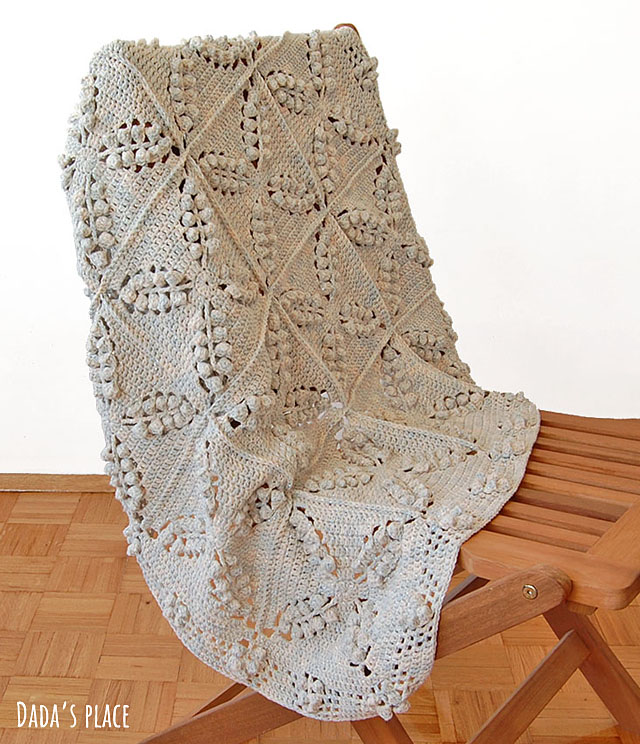
Skill level: Intermediate

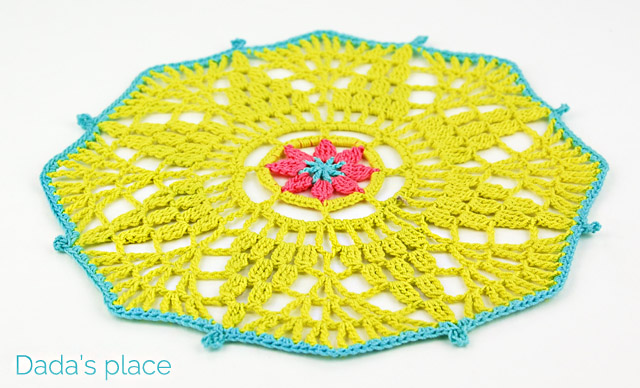
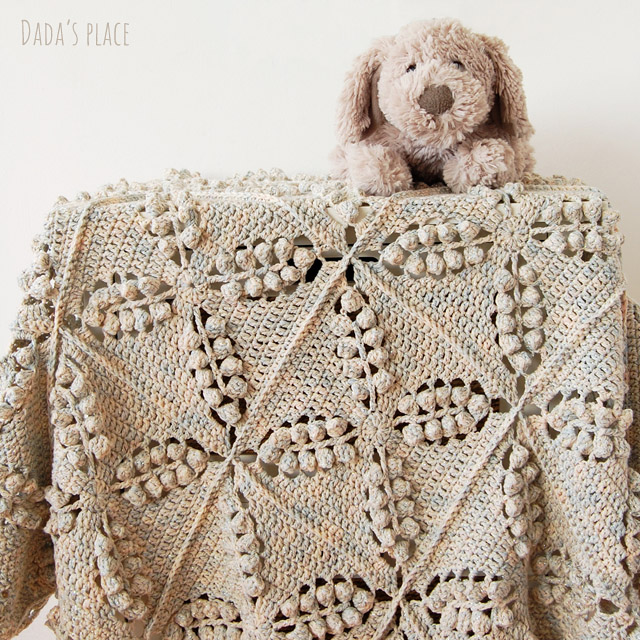
Finished size: 86 x 86 cm (34” x 34”)

The pattern is written using US crochet terms

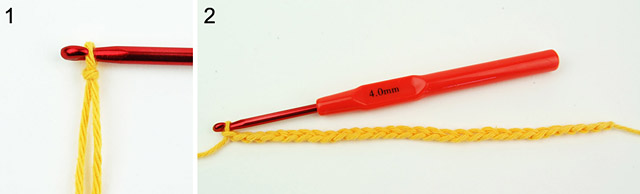
Crochet hook: 4 mm (USA – size G-6, UK-size 8)

Gauge: the square measures approximately 20 x 20 cm (7.9” x 7.9”)

Stitches & abbreviations
st – stitch
ch – chain
sl st – slip stitch
dc – double crochet
hdc – half double crochet
tr – treble crochet
Special stitches: Popcorn stitch
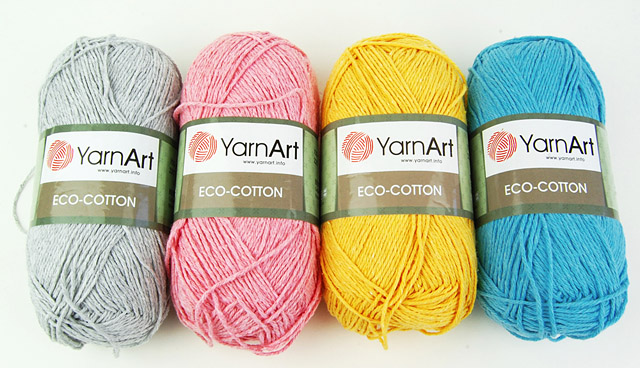
Yarn:
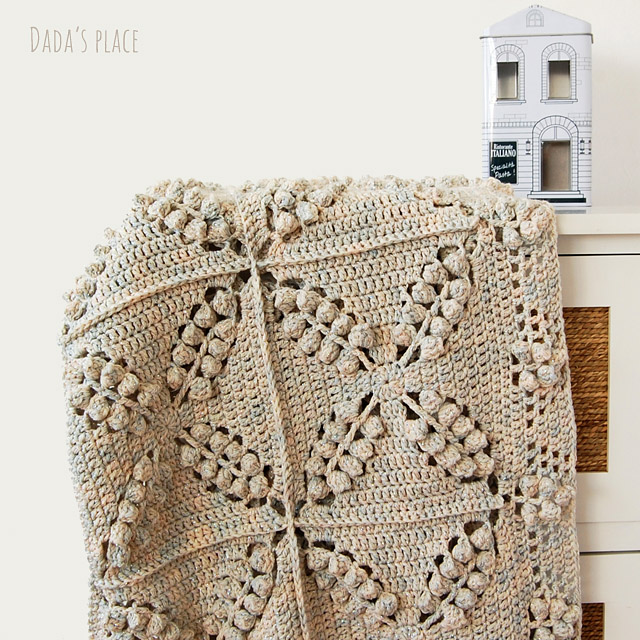
For this blanket I used beige “Una” yarn from St. George. 115m/50g
55% acrylic, 40% cotton, 5% metalized polyester
You will need 12 skeins of 50g

You can use any worsted, (4-ply) yarn. You’ll need 600g.
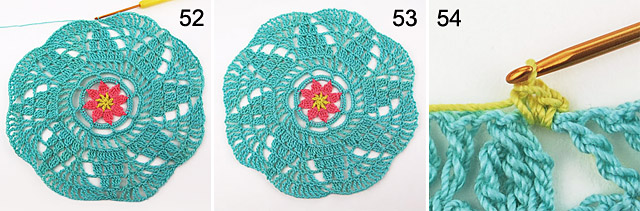
Free popcorn crochet blanket pattern

Square (make 16)

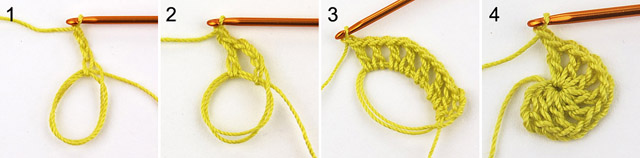
Begin with magic ring.

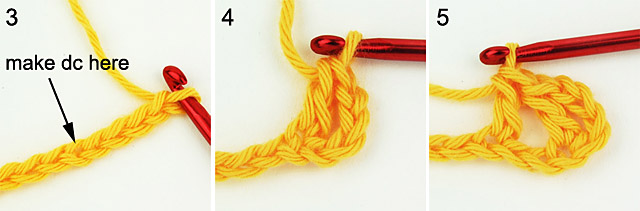
Row 1: ch-3 in ring (counts as dc), 11 dc in ring; pull the yarn tail and close the ring; join with slip st to top of initial ch-3;

Row 2: ch-6 (counts as dc + ch-3), * tr in next dc, ch-3, 2 dc in next 2 dc, ch-3; Repeat from * two more times; tr in next dc, ch-3, 2 dc in next dc, dc in next st; Join with slip st to third chain of initial ch-6;

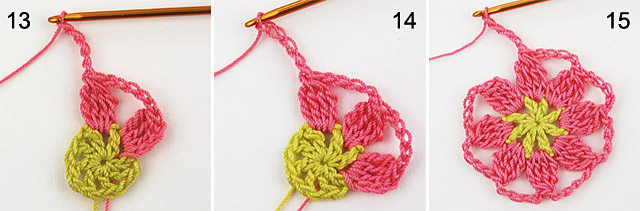
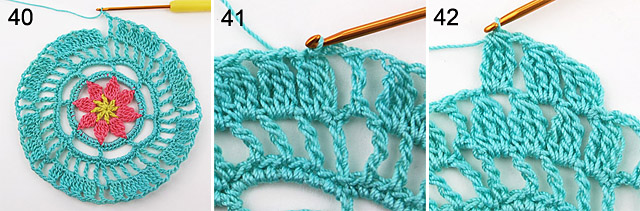
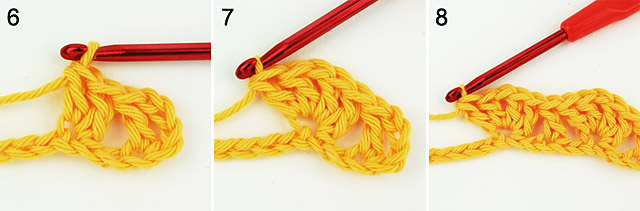
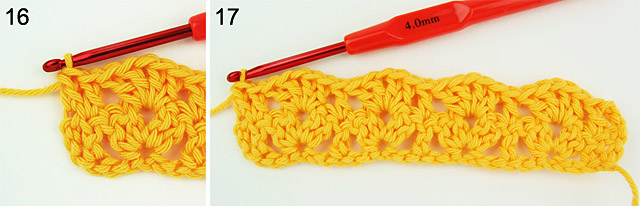
Row 3: slip st in next ch-3 space, Beginning Popcorn in same space, ch-3, tr in next tr, ch-3, Popcorn-6 in next ch-3 space, ch-2, dc in next 4 dc, ch-2, * Popcorn-6 in next ch-3 space, ch-3, tr in next tr, ch-3, Popcorn-6 in next ch-3 space, ch-2, dc in next 4 dc, ch-2; Repeat from * two more times; Join with slip st to top of Beginning Popcorn;

Row 4: slip st in next ch-3 space, Beginning Popcorn in same space, ch-3, dc in next tr, ch-3, Popcorn-6 in next ch-3 space, ch-3, dc in next ch-2 space, dc in next 4 dc, dc in next ch-2 space, ch-3, * Popcorn-6 in next ch-3 space, ch-3, dc in next tr, ch-3, Popcorn-6 in next ch-3 space, ch-3, dc in next ch-2 space, dc in next 4 dc, dc in next ch-2 space, ch-3; Repeat from * two more times; Join with slip st to top of Beginning Popcorn;

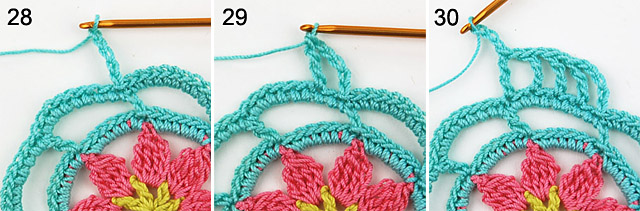
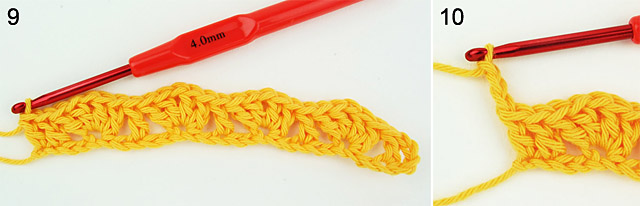
Row 5: slip st in next ch-3 space, Beginning Popcorn in same space, ch-3, dc in next dc, ch-3, Popcorn-6 in next ch-3 space, ch-3, dc in next ch-3 space, dc in next 6dc, dc in next ch-3 space, ch-3, * Popcorn-6 in next ch-3 space, ch-3, dc in next dc, ch-3, Popcorn-6 in next ch-3 space, ch-3, dc in next ch-3 space, dc in next 6 dc, dc in next ch-3 space, ch-3; Repeat from * two more times; Join with slip st to top of Beginning Popcorn;

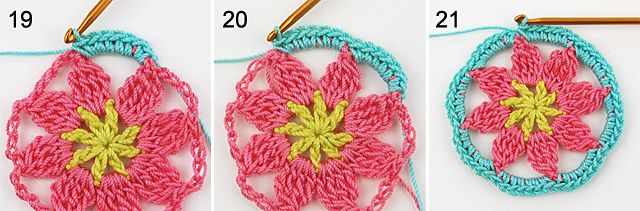
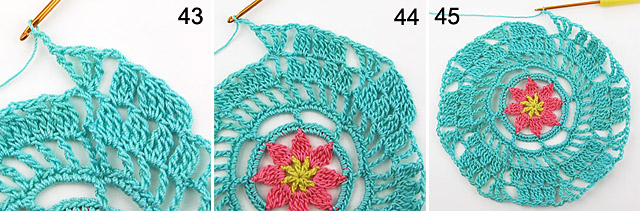
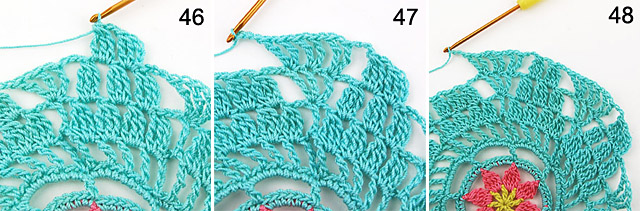
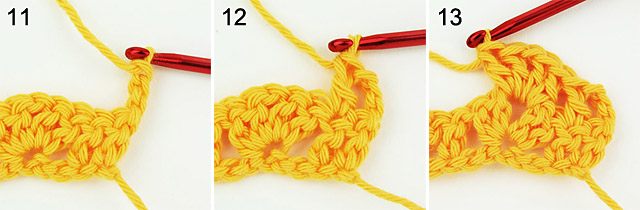
Row 6: slip st in next ch-3 space, Beginning Popcorn in same space, ch-4, Popcorn-6 in next ch-3 space, ch-3, 2 dc in next ch-3 space, dc in next 8 dc, 2 dc in next ch-3 space, ch-3, * Popcorn-6 in next ch-3 space, ch-4, Popcorn-6 in next ch-3 space, ch-3, 2 dc in next ch-3 space, dc in next 8 dc, 2 dc in next ch-3 space, ch-3; Repeat from * two more times; Join with slip st to top of Beginning Popcorn;

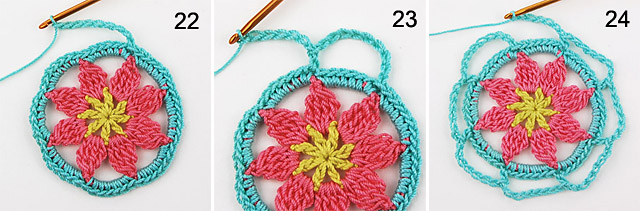
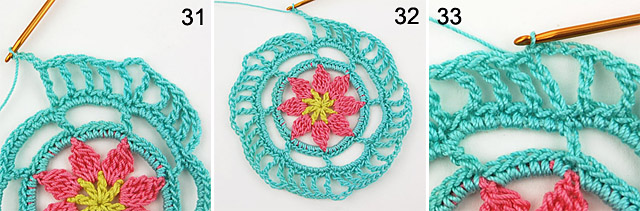
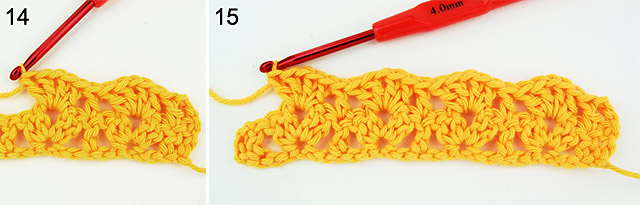
Row 7: slip st in next ch-4 space, Beginning Popcorn in same space, * ch-4, 2 dc in next ch-3 space, dc in next 12 dc, 2 dc in next ch-3 space, ch-4, Popcorn-6 in next ch-4 space; repeat from * two more times, ch-4, 2 dc in next ch-3 space, dc in next 12 dc, 2 dc in next ch-3 space, ch-4; Join with slip st to top of Beginning Popcorn.

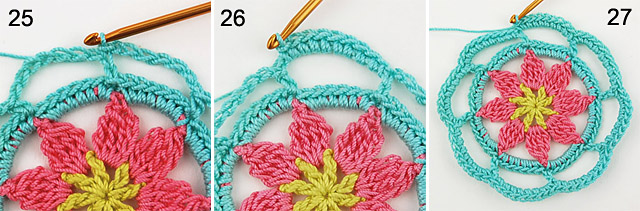
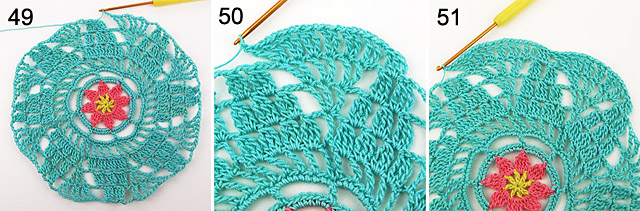
Row 8: slip st in next ch-4 space, ch-3 (counts as dc), 3 dc in the same space, * hdc in next 16 dc, 4 dc in next ch-4 space, ch-3, 4 dc in next ch-4 space; Repeat from * two more times, hdc in next 16 dc, 4 dc in next ch-4 space, ch-3; join with slip st to top of initial ch-3, or make an invisible join. Fasten off.

Free vintage style crochet blanket pattern

Joining squares

Join the squares in a 4 x 4 formation. Place squares WS together and join them together with single crochet. Make 1 sc in each stitch, working 1 sc into each corner chain space where squares meet, and 2 sc into the first and the last corner chain space of each row.
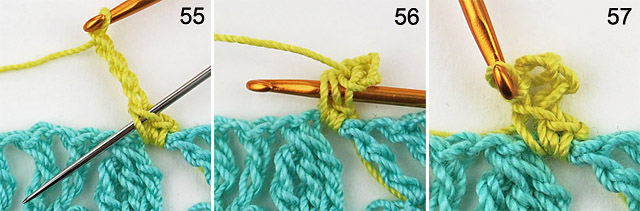
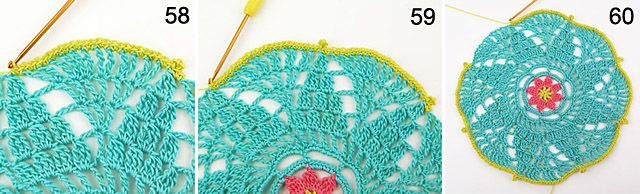
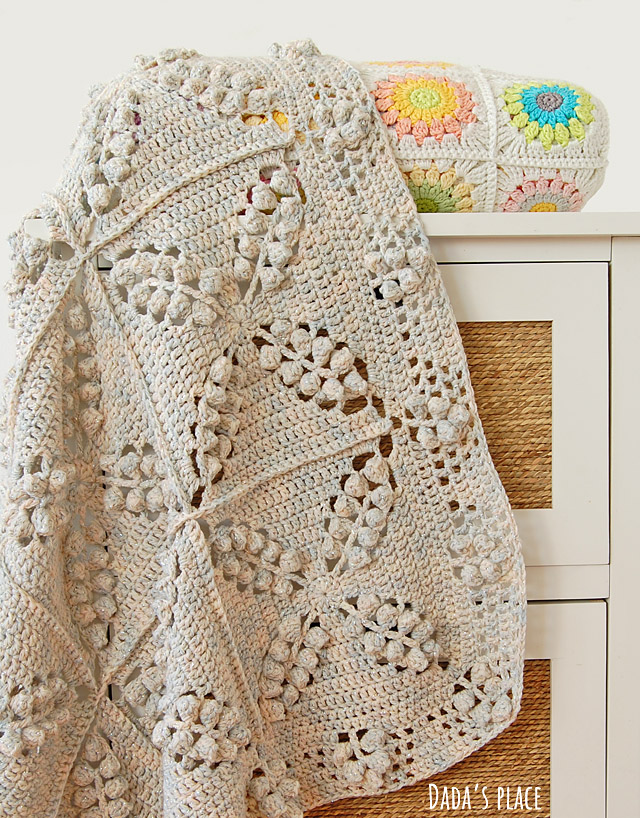
*

Border

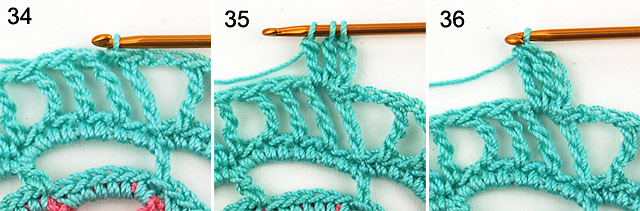
Row 1: Start the border in the sixth st to the right of left corner. Attach yarn, make ch-2 (counts as hdc), hdc in next 5 st, 3 dc in ch-3 space (corner), * hdc in next 12 st, 2 hdc in next st, hdc in next 11 st, 2 dc in next ch-3 space, ch-1, 2 dc in next ch-3 space; Repeat from * around the blanket;
In corners make 3 dc; Join with slip st to top of initial ch-2.

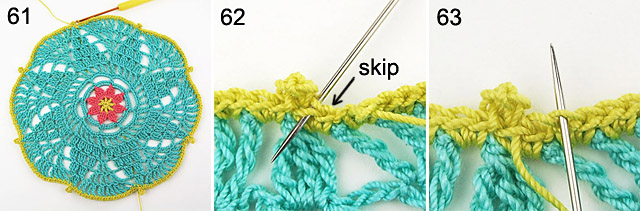
Row 2: ch-3 (counts as dc), dc in next 6 stitches, ch-2, dc in next dc, ch-2, dc in next dc, * dc in next 11 st, ch-2, skip next hdc, dc in next hdc, ch-2, skip next hdc, dc in next hdc, dc in next 11 st, ch-2, skip next dc, dc in ch-1 space, skip next dc, dc in next dc; Repeat from * along the blanket;
In corners make: ch-2, dc in next dc, ch-2; Join with slip st to top of initial ch-3;

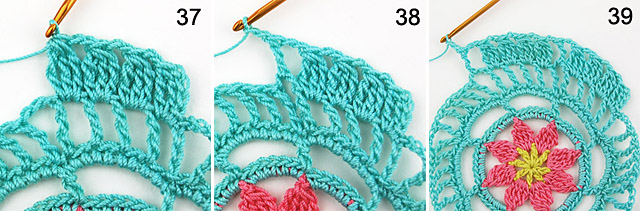
Row 3: ch-3 (counts as dc), dc in next dc, (ch-1, skip next dc, dc in next dc) twice, ch-2, skip next dc, Popcorn-6 in ch-2 space, ch-3, dc in next dc, ch-3, Popcorn-6 in next ch-2 space, ch-2, skip next dc, dc in next dc, * (ch-1, skip next dc, dc in next dc) twice, dc in next dc, (ch-1, skip next dc, dc in next dc) twice, ch-2, skip next dc, Popcorn-6 in next ch-2 space, ch-2, dc in next dc, ch-2, Popcorn-6 in next ch-2 space, ch-2, skip next dc, dc in next dc; Repeat from * along the blanket;
In corners make: ch-2, Popcorn-6 in ch-2 space, ch-3, dc in next dc, ch-3, Popcorn-6 in next ch-2 space, ch-2; Join with slip st to top of initial ch-3;

Row 4: ch-3 (counts as dc), dc in next dc, dc in next ch-1 space, ch-1, skip next dc, dc in next ch-1 space, ch-1, skip next dc, dc in next ch-2 space, ch-3, Popcorn-6 in next ch-3 space, ch-5, Popcorn-6 in next ch-3 space, ch-3, dc in next ch-2 space, * (ch-1, skip next dc, dc in next ch-1 space) twice, dc in next 2 dc, dc in next ch-1 space, ch-1, skip next dc, dc in next ch-1 space, ch-1, skip next dc, dc in next ch-2 space, ch-2, Popcorn-6 in next ch-2 space, ch-5, Popcorn-6 in next ch-2 space, ch-2, dc in next ch-2 space; Repeat from * along the blanket;
In corners make: dc in ch-2 space, ch-3, Popcorn-6 in next ch-3 space, ch-5, Popcorn-6 in next ch-3 space, ch-3, dc in next ch-2 space; Join with slip st to top of initial ch-3;

Row 5: ch-3 (counts as dc), dc in next 2 dc, dc in next ch-1 space, ch-1, skip next dc, dc in next ch-1 space, ch-1, skip next dc, dc in next ch-3 space, ch-4, Popcorn-6 in ch-5 space, ch-4, dc in next ch-3 space,* (ch-1, skip next dc, dc in next ch-1 space) twice, dc in next 4 dc, dc in next ch-1 space, ch-1, skip next dc, dc in next ch-1 space, ch-1, skip next dc, dc in next ch-2 space, ch-2, Popcorn-6 in ch-5 space, ch-2, dc in next ch-2 space; Repeat from * around the blanket;
In corners make: dc in ch-3 space, ch-4, Popcorn-6 in ch-5 space, ch-4, dc in next ch-3 space; Join with slip st to top of initial ch-3;

Row 6: ch-3 (counts as dc), dc in next 3 dc, dc in next ch-1 space, ch-1, skip next dc, dc in next ch-1 space, ch-1, skip next dc, dc in next ch-4 space, ch-2, dc in same space, ch-1, dc in next ch-4 space, ch-2, dc in same space, * (ch-1, skip next dc, dc in next ch-1 space) twice, dc in next 6 dc, dc in next ch-1 space, ch-1, skip next dc, dc in next ch-1 space, ch-1, skip next dc, dc in next ch-2 space, ch-2, dc in next ch-2 space; Repeat from * along the blanket;
In corners make: dc in ch-4 space, ch-2, dc in same space, ch-1, dc in next ch-4 space, ch-2, dc in same space; Join with slip st to top of initial ch-3, or make invisible join.

Norwegian forest blanket pattern by dadas place

Hope you will like the pattern, and maybe will try it out! If so, I would love to see it! Please feel free to share it to my Facebook page, or on Instagram, and use hash tag #norwegianforestblanket

I’m looking forward to seeing your beautiful creations, and that will bring me a lot of joy!

*

Although this pattern is free, it is copyright protected, so please don’t sell or publish this pattern anywhere, don’t translate it, or make YouTube videos without my permission. Thank you for respecting my work!

Norwegian forest blanket step by step tutorial

You can buy the printable pdf crochet pattern and step-by-step tutorial with more than 120 pictures, crochet chart for the square and the border for only $3.97! Click here to purchase the pattern and support my work. (payment options: credit cards and PayPal)

*

Follow me Doily Free Pattern

25/03/2019 by Dada Filed Under: Free crochet patterns 8 Comments

crochet doily free pattern

I bet that you love free crochet patterns! But maybe doilies are not exactly your jam. I know. I’ve been there. But, doilies are so fun to make! Believe me! I think that they are ideal crochet projects for any beginner, because they are quite quick to make, and you can have that sweet feeling of accomplishment after just several hours of your effort. Plus they are beautiful! 

how to crochet doily dadas place free pattern

Simple and elegant, this doily is the perfect crochet project for beginners. Or ideal project for a lazy and relaxing weekend… You can make this doily to treat yourself, or you can tell someone how important he/she is by gifting them this beautiful handmade doily.

*

Skill level: Beginner
Stitches: magic ring, slip stitch, chain stitch (ch), single crochet (sc), half double crochet (hdc), double crochet (dc), treble crochet (tr), 4tr bobble stitch, 3tr bobble stitch, picot-4 stitch, standing single crochet
Crochet hook: 2mm (USA – size B1)
Size: 18 x 18 cm (7” x 7”)
Crochet terms: standard US crochet terms
Yarn: thread for doilies 100% cotton, 530m/100g – you will need approximately 10 g of the main color.

free crochet doily step-by-step tutorial

So, let’s get started!

doily free crochet pattern

Start with a magic ring. Make ch-4 in ring (counts as dc + ch-1) (1),

dc in ring, ch-1 (2),

[dc in ring, ch-1] x 6 (3);

pull the yarn tail and close the ring. You should have 8 dc with ch-1 between each dc (4);

beginner friendly free crochet pattern

Join with slip st to the third chain of the initial ch-4; Fasten off (5).

Take the yarn you want to use for the petals. Attach the yarn in any ch-1 space and make ch-4 (counts as the first tr in bobble stitch) (6);

Now, we’re going to make an “incomplete” tr – yo twice, insert the hook into the same space, yo, pull up a loop, [yo, draw the yarn through 2 loops] twice. You should have two loops on the hook (7);

make two more “incomplete” tr (itr henceforward) in the same space; now you have four loops on your hook (8);

step-by-step crochet doily tutorial

yo (9),

and draw the yarn through all four loops on the hook. This is our first 4 tr bobble stitch (10);

make ch-5 (11),

then 4 itr in the next ch-1 space; now you have five loops on the hook (12);

free crochet doily pattern

yo, and draw the yarn through all five loops on the hook, ch-5 (13);

make * 4 tr bobble stitch in the next ch-1 space, ch-5 (14);

repeat from * five more times; you should have 8 bobble stitches with ch-5 between each bobble (15).

dadas place free crochet pattern

join with slip st to the top of the beginning bobble (16);

Fasten off. We’re going to make a standing sc, so take the background color and make a slip knot on your hook (17).

Make standing sc – (Insert hook into stitch, yarn over, pull up a loop, yarn over, and draw yarn through both loops on the hook) at the beginning of any ch-5 spaces (18).

crochet doily step-by-step free tutorial

Make 6 sc in the same space – 7 sc in total (19),

make 7 sc in the next ch-5 space (20),

then 7 sc in the next 6 ch-5 spaces (21);

free crochet doily pattern by Dadas place

join with slip st to the standing sc and make ch-9 – counts as hdc + ch-7 (22);

* skip the next 6 sc, and make hdc in the next sc, then make ch-7 (23);

repeat from * six more times (24);

free crochet doily step-by-step tutorial by Dadas place

Join with slip st to the second chain of the initial ch-9 (25);

make 9 sc in the next ch-7 space (26);

make 9 sc in the next 7 ch-7 spaces (27);

crochet mandala free pattern

join with slip st to the first sc and make ch-5 – counts as tr + ch-1 (28);

skip the next sc, make tr in the next sc (29);

[ch-1, skip the next sc, tr in the next sc] x 3, ch-3 (30);

crochet mandala free step-by-step tutorial

make * tr in the next sc, [ch-1, skip the next sc, tr in the next sc] x 4, ch-3 (31);

repeat from * 6 more times (32);

join with slip st to the fourth chain of the initial ch-5 (33);

mandala free crochet pattern

make slip st in the next ch-1 space (34).

Now, we’re going to make another bobble stitch. This time 3 tr bobble, so, make ch-4, 2 itr in the same space (35);

yo, and draw the yarn through all three loops on the hook (36);

mandala crochet pattern by dadas place

make [ch-2, bobble in the next ch-1 space] x 3 (37);

ch-3, tr in the next ch-3 space, ch-3 (38);

make * [bobble in the next ch-1 space, ch-2] x 3, bobble in the next ch-1 space, ch-3, tr in the next ch-3 space, ch-3 (39);

modern doily free crochet pattern

repeat from * six more times (40);

join with slip st to the top of the beginning bobble (41);

slip st in the next ch-2 space, make the beginning bobble, [ch-2, bobble in the next ch-2 space] x 2 (42);

dadas place free crochet tutorial

ch-3, tr in the next tr, [ch-1, tr in the same tr], x 2, ch-3 (43);

make * [bobble in the next ch-2 space, ch-2] x 2, bobble in the next ch-2 space, ch-3, tr in the next tr, [ch-1, tr in the same tr], x 2, ch-3 (44);

repeat from * six more times (45);

free crochet step-by-step mandala tutorial

join with slip st to the top of the beginning bobble, slip st in the next ch-2 space, make the beginning bobble, ch-2, bobble in the next ch-2 space (46);

ch-3, tr in the next tr, ch-1, tr in the same tr, [ch-1, tr in the next tr, ch-1, tr in the same tr] x 2, ch-3 (47),

make * bobble in the next ch-2 space, ch-2, bobble in the next ch-2 space, ch-3, tr in the next tr, ch-1, tr in the same tr, [ch-1, tr in the next tr, ch-1, tr in the same tr] x 2, ch-3 (48);

crochet doily free pattern and step-by-step tutorial

repeat from * 6 more times (49);

join with slip st to the top of the beginning bobble, slip st in the next ch-2 space, make the beginning bobble, [ch-1, tr in the next tr, ch-1, tr in the same tr] x 6, ch-1 (50);

make * bobble in the next ch-2 space, [ch-1, tr in the next tr, ch-1, tr in the same tr] x 6, ch-1 (51);

free crochet mandala pattern by dadas place

repeat from * 6 more times (52);

join with slip st to the top of the beginning bobble; fasten off (53).

Make a slip knot on your hook with a contrasting color, then standing sc in ch-1 space before any bobble, make sc in the same space (54);

Free crochet pattern - follow me doily

Now, we’re going to make a picot-4 stitch, so make ch-4; I marked the stitch where you should make slip st. It’s the fifth stitch from the hook (55);

so, pull the hook through both loops of that stitch (56),

yo, and draw the yarn through the stitch and through the loop on your hook (57).

how to crochet doily free step-by-step tutorial by dadas place

Make 2 sc in the next thirteen ch-1 spaces (58);

* make picot-4, 2 sc in the next thirteen ch-1 spaces (59);

repeat from * five more times (60);

free crochet pattern - mandala step-by-step tutorial

make picot-4, 2 sc in the next twelve ch-1 spaces; We’re going to make an invisible join, now. Cut the yarn and pull it through the stitch (61).

Thread a tapestry needle. Skip the standing sc, and insert your needle under both loops of the next sc, from back to front, and pull it through (62);

Insert your needle back, in the last sc you made, through the back loop only, from front to back, and pull it through. Weave in the yarn end (63).

free crochet doily pattern for beginners

And now you have it! Simple to make, beautiful and modern doily pattern! Hope you will like it! I would love to see your finished creations, so please share them on the Internet, tag me and use #followmedoily hash tag.

simple doily pattern

Although this pattern is free, it is copyright protected, so please don’t sell or publish this pattern anywhere, don’t translate it, or make YouTube videos without my permission. Thank you for respecting my work.
*
If you’d like to have a printable pdf version of the pattern, you can get it for only $3.97 in Dada’s place shop, here.
*
Happy crocheting!

*

Free Crochet Pattern: Lily’s Blanket

21/05/2018 by Dada Filed Under: Crochet baby blanket patterns, Free crochet patterns 9 Comments

If you love crochet blankets, stripes, simplicity and ease, then please continue reading, because this blanket is as simple and easy to make, as it is beautiful and stylish. And stripes surely add that modern touch to it.

You can make Lily’s blanket in just two colors (and I honestly think that gray-white combination might be the real winner), three colors, four colors (like I did), or as many colors as you like. By making every row (or every 2 or 3 rows) in different color it might be the ideal crochet project for going through all of the remaining yarn from your stash, which you don’t know what to do with.

Regarding the yarn, this pattern is not demanding at all. Although I used quality cotton yarn, you can make it with any beautiful, soft yarn. Even with acrylic yarn.

This blanket is worked back and forth in rows, and can be made in any size.
If you’d like to make a different size blanket, simply work the foundation chain to the desired width in a multiple of 6.

Crochet terms: Pattern is written using US crochet terminology. If you prefer UK terminology instead of double crochet make treble crochet, and that’s it! It’s that simple!

Level: Beginner
Size: 70 cm (27.5”) width, 100 cm (39”) length
Crochet hook: 4 mm (USA – G/6)
Gauge: 10 stitches and 9 rows in 10 cm (although gauge is not critical to this project)

Yarn:
Yarn Art – Ecco-cotton
100g/220m
85% cotton 15% polyester

● 3 skeins of gray (763)
● 1 skein of pink (766)
● 1 skein of yellow (764)
● 1 skein of turquoise (765)
or any Light worsted yarn (3 or Light)

So, let’s get started!

* To start, make a slip knot on your hook; (Picture 1)

* continue making foundation chain. Count your chains as you go, and stop when you reach the desired width in multiples of 6. I made ch-x. (Picture 2)

* Count fifth chain of your hook, (Picture 3)

* and make dc in that st. (Picture 4)

* Skip the next two chains, and make dc in the next ch. (Picture 5)

* Make one more dc in the same stitch; (Picture 6)

* Make ch-1, 2 dc in the same stitch. (Picture 7)

* skip the next two chs and make dc in the next ch, skip the next two chs and make [2 dc, ch-1, 2 dc] in the next ch. (Picture 8)

* Repeat from * until you are left with only 4 chs. Skip the next two sts, and make dc in the next two sts. We will make 2 dc at the end of each row. We will make ch-3 (which counts as dc) and dc at the beginning of each row. (Picture 9)

* Make ch-3 (counts as the first dc), (Picture 10)

* turn your work over, (Picture 11)

* and make dc in the next dc. (Picture 12)

* Skip the next two dc and make [2 dc, ch-1, 2 dc] in the next ch-1 space; (Picture 13)

* next dc, skip the next two dc and make [2 dc, ch-1, 2 dc] in the next ch-1 space; (Picture 14)

* Repeat from * until you’re left with only four sts. (Picture 15)

* Skip two dc, make dc in the next dc, and at the end make dc in the last dc. (Picture 16)

* And this is the all you need to know in order to make this blanket. Repeat this row until you reach the desired length.(Picture 17)

Written pattern row by row:

With gray color: Make foundation chain of 150 stitches.
Row 1: Make dc in the fifth chain from the hook, *skip 2 chs, [2 dc, ch-1, 2 dc] into the next ch, skip 2 chs, dc in the next ch; repeat from * 23 more times, dc in the last stitch.
Row 2: ch-3, dc in the next dc, * skip two dc, [2 dc, ch-1, 2 dc] into the next ch-1 space, skip 2 dc, dc in the next dc; repeat from * 23 more times, dc in the top of the initial ch-3.
Row 3 – 6: Repeat row 2. Change the color to pink in the last stitch of the 6th row.
Row 7 – 14: With pink color: Repeat row 2. Change the color to gray in the last stitch of the 14th row.
Row 15 – 20: With gray color: Repeat row 2. Change the color to yellow in the last stitch of the 20th row.
Row 21 – 28: With yellow color: Repeat row 2. Change the color to gray in the last stitch of the 28th row.
Row 29 – 34: With gray color: Repeat row 2. Change the color to turquoise in the last stitch of the 34th row.
Row 35 – 42: With turquoise color: Repeat row 2. Change the color to gray in the last stitch of the 42nd row.
Row 43 – 48: With gray color: Repeat row 2. Change the color to pink in the last stitch of the 48th row.
Row 49 – 56: With pink color: Repeat row 2. Change the color to gray in the last stitch of the 56th row.
Row 57 – 62: With gray color: Repeat row 2. Change the color to yellow in the last stitch of the 62nd row.
Row 63 – 70: With yellow color: Repeat row 2. Change the color to gray in the last stitch of the 70th row.
Row 71 – 76: With gray color: Repeat row 2. Change the color to gray in the last stitch of the 76th row.
Row 77 – 84: With turquoise color: Repeat row 2. Change the color to gray in the last stitch of the 84th row.
Row 85 – 90: With gray color: Repeat row 2. At the end of the 90th fasten off. Weave in the yarn end.

And now you have it! Very simple, but beautiful crochet blanket pattern! Hope you will like the pattern, and if you make it, please share it using the tag #lilysblanket. I would be thrilled to see your own creations of this pattern.

I’m planning on hosting a yarny giveaway related to this blanket very soon, so if you don’t want to miss it, please sign up for my newsletter, or follow me on social media: Facebok here, and Instagram here.

Happy crocheting!

  • « Previous Page
  • 1
  • 2
  • 3
  • 4
  • …
  • 9
  • Next Page »

Dada's shop


Copyright © 2025 · Dadas Place.com